Are you getting a Taskeng.exe error in your Windows 10? A black screen or tasking.exe executable error message keeps pop-up on the Computer screen. You don’t know how it does happen and the root cause of that error in your Windows 10. You think that it’s only for a certain period of time and will be lost automatically, but that day never comes.
Lots of Windows 10 users reported that Taskeng.exe error pop-up once a while, and if you are one of them who gets frustrated because of this error, then don’t worry. Just because you can’t fix the tasking.exe error doesn’t mean that you can’t get rid of it. Maybe you didn’t find the right and perfect solution to solve the error. That’s why we are here to fix the Taskeng.exe error in Windows 10 in this article.
There are lots of reasons why your Windows 10 is getting a Taskeng.exe error. Sometimes it’s because of the malware infection which triggers your registry entries and corrupts the files. Besides, an error can also be caused by another internal system error. Whatever the reason, if you find the right solution, then you will never get such an error in your Windows 10.
So, if you never want to see or fix the Taskeng.exe error in your Windows 10 then make sure to head through the whole article.
But before that, let’s take a little time to know about a Taskeng.exe error if you didn’t know anything about it, and it’s your first time seeing that error. In addition, also learn the causes that can trigger the tasking.exe error in your PC.
What is Taskeng.exe?
Taskeng.exe, also known as Task Scheduler Engine, is signed by the Microsoft Corporation. It is mainly located in the C:\Windows\System32 folder and basically found in any Windows operating system (10/8/7/XP).
Task Scheduler Engine is considered as the most essential system file which is responsible for keeping task on tracks which are placed to run at any predetermined time. Whenever the user calls or requests some task in the system, then the Task scheduler engine runs to complete the request. In other words, the task scheduler engine monitors the user-chosen criteria, and when the criteria are met to its predefined task, then it executes that task.
Let’s get clear with an example of what I meant by a predefined Criteria of Taskeng.exe. Suppose you schedule some tasks on your computer or let’s say runs a program at midnight, and you don’t want to turn off your computer manually; at that time task scheduler engine does the work for you.
Causes that Trigger the Taskeng.exe Error
Task Scheduler Engine plays a vital role in a Windows operating system, but sometimes it causes so much trouble in a computer. Many Windows users reported that they are constantly getting a tasking.exe pop-up on the screen. They either get a tasking.exe black screen error or a message that shows “certain executable file cannot be found, make sure you typed the name correctly.”
So what causes that triggers this tasking.exe pop-up in Windows 10 OS. Let’s see the following common causes down below.
- You might have corrupted Windows registry keys, which are associated with tasking.exe.
- If your Taskeng.exe currently used file is removed or modified by other programs.
- A deadly malware might be camouflage itself as a tasking.exe.
- Other corrupted system files are associated with the tasking.exe.
Security Risk that Might Occur
Our computer security is the first priority which we need to look for. If our system got breach, then it no longer our system – it’s on another unknown person’s hand. Taking this thing in a serious way, if the taskeng.exe pop-up is just a normal predefined process that runs automatically, then it’s not a big deal – we can solve it with the simple methods which I have mentioned down below. But what if it’s a nasty malware or a virus infection that is created by an unknown cybercriminal?
Once the infection got spread on your computer, then it will suddenly charge the Windows Run and RunOnce Registry Keys. After that, it targets the stored register values in the keys and executes the taskeng.exe error. That’s why you can see a pop-up black screen error and some other messages on your Windows computer screen. It’s an easy way for browser hijackers like MyWebSearch to triggers both tasking.exe error and your data.
Besides, not only this nasty malware executes the tasking.exe error but also affect other system things, such as:
- Slow down the PC by utilizing your system resource through data mining.
- Acquire your PC Administration permission.
- Throw lots of advertisements by disabling your ad-blocker if you installed one.
- Collects information from your PC, such as personal info, keystrokes, and other useful info then sends the data to third parties.
- Consume more system memory.
So, if you are already facing these above-mentioned issues in your Windows 10 computer, then it’s time to fix the tasking.exe error. Just head through the down below different methods and try them all to make your PC normal once again.
How to Fix Taskeng.exe Error in Windows 10 | Stop Taskeng Exe From Running
Now you know that what causes can trigger the tasking.exe error in your Windows 10 PC. If you ignore the error and continue to work on your Computer, then one day or another day, you may get in huge trouble. So it’s better to fix the taskeng.exe pop-up error in your Windows 10 with the help of simple mentioned methods down below.
Inspect Whether Taskeng.exe Is a Virus or Not

The first step which you need to take is to inspect whether Taskeng.exe is a virus or not. If it’s a virus, then you need to remove it from your Computer, and your problem will be solved with just a single method. So if your windows 10 pop-up a message showing a Taskeng.exe error on the screen, there is a pretty high chance that you are dealing with a virus infection.
However, if you still want to make sure that it is caused by a virus infection, then you can verify it with another method. Just open your Task Manager by pressing (Ctrl + Shift + Esc) on your keyboard and then go to the Processes tab. Search for the taskeng.exe then, right-click on it, and open the file location. If the path takes you somewhere else besides the C:\Windows\System32, then it’s definitely caused by malware.
Now you have confirmed that the tasking.exe is infected by malware, so it’s time to move to the next method to get rid of that virus. Use the 2nd method down below.
Use Malwarebytes to Scan Your Computer
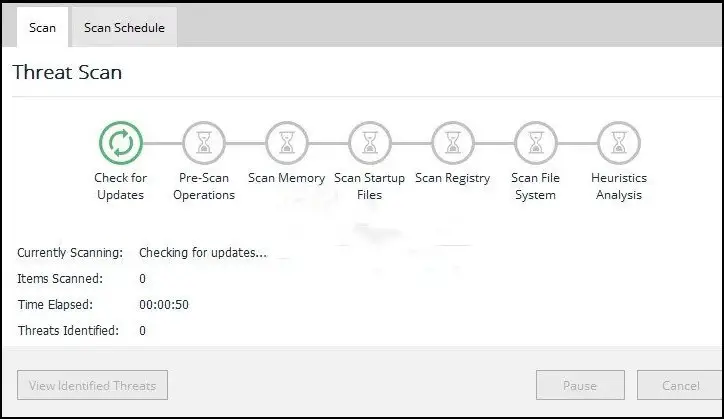
Now you already confirmed that your system got infected by malware with the help of the above method. So let’s take an appropriate measure to scan your computer system. If you also might be thinking about deleting the tasking.exe from your system to fix the error, this process is only temporary. You have to perform the full scan if you do not want to see a tasking.exe error ever again on your screen.
So, use Malwarebytes – an effective, leading, and best antivirus software that deals with any viruses. It’s basically the best security software that will keep your Computer safe from its powerful features. The interface of Malwarebytes is easy to use, faster, and lightweight. Besides, the technology that Malwarebytes uses is beyond the expectation, that’s why it is considered an effective security tool for your Windows computer system.
Download the antivirus by clicking on a link here. After that, all you have to do is install the software and click on the Scan button.
Use the Clean Boot
Another method to find the root cause of the Taskeng.exe error is by using the clean boot in your Computer. After the clean boot, it might solve your black screen issues in your Computer. So let get started with the following down simple steps.
- First of all, go to the Windows search box, which is located at the bottom left side.
- Type msconfig and then press enter, which opens your computer system configuration.
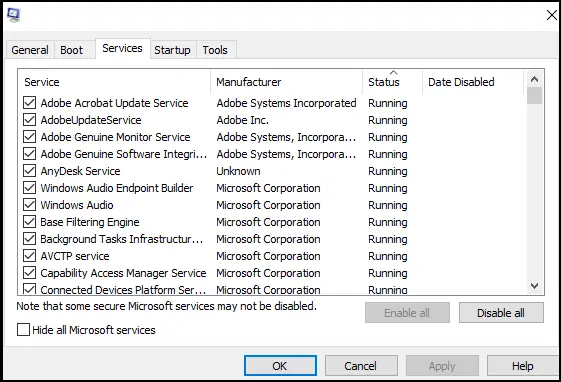
- Now, choose the Services tab then tik on the Hide all Microsoft Services. After that, click on Disable all options.
- Now, choose the Startup tab and then click on the Open Task Manager.
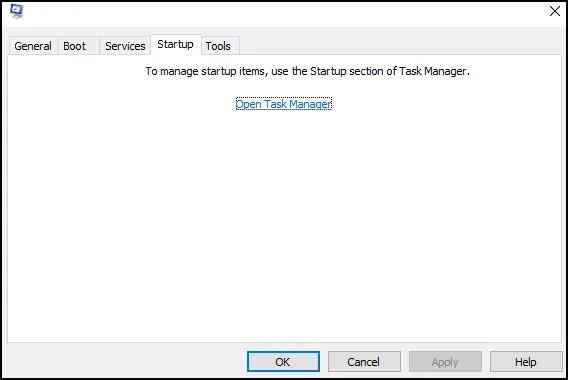
- There, if you have suspected any corrupted program including the tasking.exe, then choose those programs and click on a disable option.
- After that, close the task manager and click Ok on System Configuration.
- Now, restart your computer and see if your problem is solved or not.
In case you still face the same tasking.exe error, then move to other methods down below.
Also Read: How to Reset Windows 10 to Default Factory Settings
Disable User_Feed Synchronization
Disabling the system user_feed synchronization from the task scheduler can solve your tasking.exe pop-up error in your Windows 10. That’s because some windows users reported that they successfully solve the issues by implementing this method. So if you also want to fix these taskeng.exe issues from your Windows 10, then follow the simple procedure down below.
Besides, you can also use this method in your Windows 7 operating system.
- So, press the Windows key + R on your keyboard.
- Now, type taskschd.msc and then press enter.
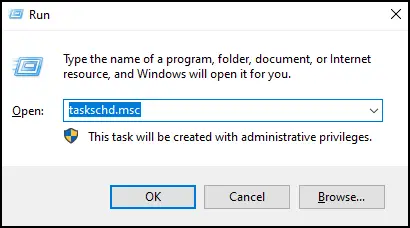
- After that, select Task Scheduler Library and then right-click and select the View option. After that, enable Show Hidden Task.
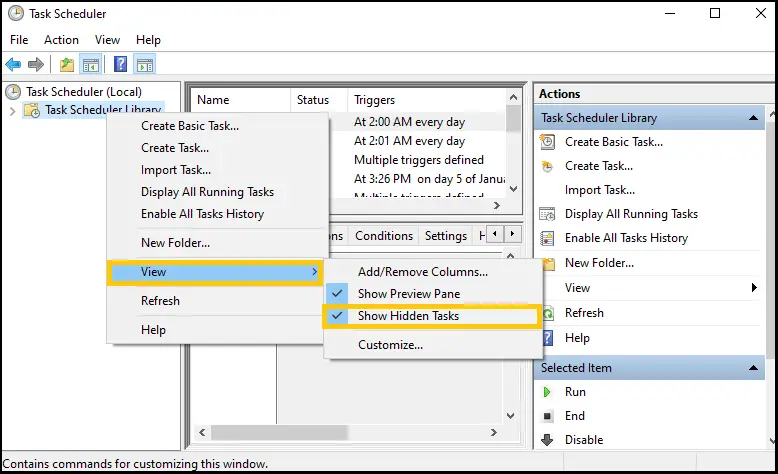
- Now, search for the User_Feed_Synchronization, select that program and go to the History section.
Note: If you can’t see any error reports along with the date and time in the history section, then this method won’t work for you. You have to move to the exact down-listed method. However, if you can see those reports, then keep following the steps. - On the right-side panel, choose the Disable option, and you are done.
- Now, finally, restart your computer, and your tasking.exe pop-up error will be solved.
Sometimes, Windows can’t solve the tasking.exe even though you follow this method. So you have to move to the down mentioned method.
Disable Office Background Task Handler Registration
Now you have to disable Office Background Task Handler Registration from the same task scheduler. This time the issue is caused by the bug in Microsoft app because sometimes it automatically installs the app and causes this error. So to get rid of the taskeng.exe issue, follow the simple down steps.
- Open the Task Scheduler from the run. Press Windows key + R shortcut key to open run.
- Select the Task Scheduler Library, right-click on that, and select the 11view option to enable Show hidden tasks.

- After that, expand the Microsoft under the Task Scheduler Library and then double-click on Office.
- Now, choose officebackgroundtaskhandlerregistration and then click on the disable option.
So these are the above simple procedure to fix tasking.exe error in your Windows 10.
Use the SFC (System File Checker) Command
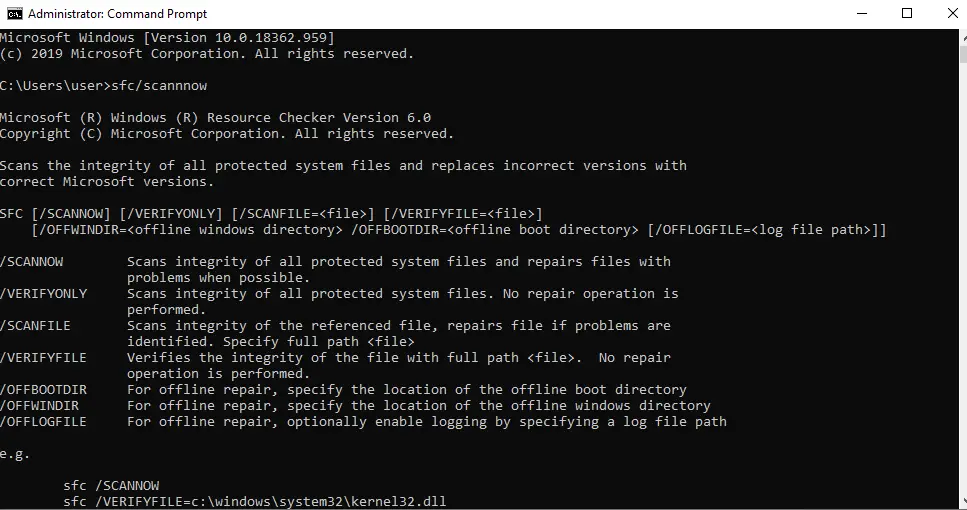
You can also work with the SFC command to fix the tasking.exe pop-up error in your Windows 10 OS. Using this command, you might be able to fix the windows corrupted system file and solve the deal with the tasking.exe pop-up.
So, let’s move to the easy steps down below.
- Open your CMD (command prompt) as run as administrator.
- Now inside the CMD screen, type sfc/scannnow command and hit enter. After that, it will start the scan process.
- So wait for a couple of seconds and let the scan complete.
- Once the scan is fully completed, restart your computer.
IS Taskeng exe a Virus?
Well, usually the Taskeng.exe is responsible for keeping the predefined task on the proper track in the Windows 10. It does work silently in the background, but sometimes users see the pop-up message of tasking.exe on the screen. If it pop-up automatically without any reason that it can definitely occur due to virus infection.
So to tackle these errors, see the methods mentioned above.
Conclusion
Now use one of the methods as mentioned earlier to fix the taskeng.exe error in Windows 10. Or start with all the methods until you solve your problem. Who knows, you might fix your pop-up issue with the help of the first method or the second one.
Besides, do not worry when you get any kind of system error on your Windows PC. Instead of worrying, take time, and think about the solutions. If you can’t think about the right way to solve your issues, then we are always there for you. Just visit our official site Online Help Guide for more Windows-related articles.
Which method works on your Windows 10 PC? Throw your answer in the comment section down below.
Thanks for reading our article.

