Steam overlay is a component of steam that allows the user to use it on top of any game you are playing. This feature provided by steam doesn’t work for all games it only works for steam games. Basically what steam overlay does is it allows the user to chat, browse and multitask. At the same time where you are gaming. The steam overlay also allows the user to use the steam feature from the game itself without opening the launcher. If your games start crashing or freezing using this feature then you can enable or disable it. So, How To Disable Steam Overlay?
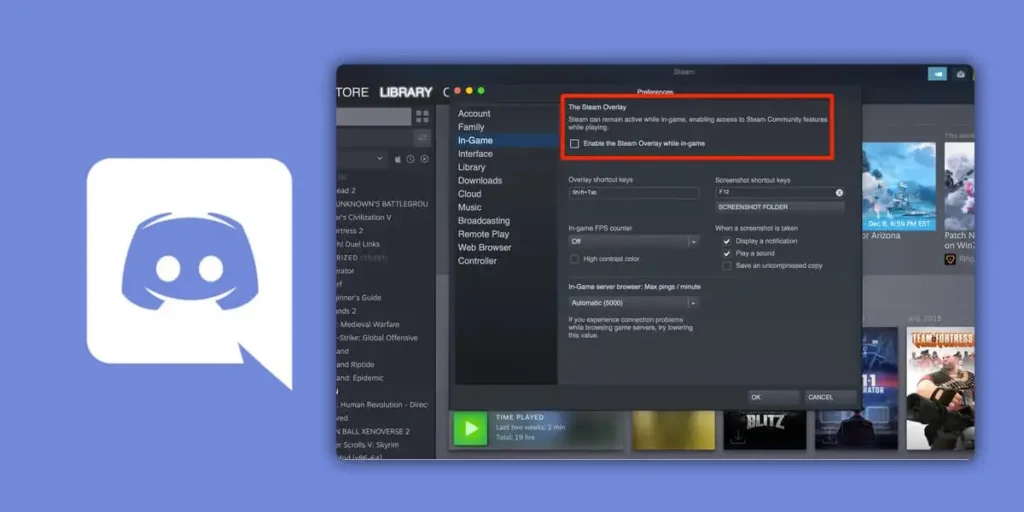
To trigger the steam overlay, just hit the shift+tab which is a default key to enable or disable. The steam overlay but for disabling the steam overlay open steam on your pc go to the steam settings then click on the in-game option. Then you’ll see an option to enable the steam overlay while in-game untick the option and hit ok after doing this you’ll disable the steam overlay.
After you have disabled the steam overlay you cannot chat, browse to talk to a friend during the middle of gaming or you can say you cannot multitask during the game. After you disable the steam overlay your game starts to run smooth and you’ll be able to enjoy the game more freely. There are various methods to disable the steam overlay and various interesting to steam and its features rede the article below so you can know more about steam.
What Is Steam Overlay?
Steam overlay is a component of steam that allows the user to use it on top of steam games only. Using this steam overlay feature you can chat, browse or talk with your friends in the middle of the game. But it puts huge pressure on the CPU, RAM, and GPU of the computer.
Shift+tab is the default key to trigger the steam overlay. However, they can be changed by the user according to their easiness.
Should You Disable Steam Overlay?
As it has already been mentioned earlier it is a feature of steam, not a bug. Because it works in a huge range of games it is not possible to be perfectly optimized for all the games sometimes the steam overlay makes the games lag more sometimes. If the games crash and the performance of the pc drops by a huge percentage then you should turn off or disable the steam overlay it won’t hurt your pc or the games on your steam. It does not avail, so you can always turn it back on.
How does steam overlay affect your gaming experience?
For an average gaming pc, a good configuration of the hardware is the pre-condition. For instance, if you are playing a game that is launched through steam, using the steam overlay option may cause performance issues to your computer leading drop in fps and slower performance than usual.
Also Read: Apex Legends Not Working.
Can You Stop Steam Overlay For A Specific Game?
Yes, you can disable steam overlay for one game only and can fix the fps drop game being crashed and enjoy the game more properly. To disable the steam for a particular game first you have to “open stream” on your pc then go to “library” after that right-click on the target game and select “properties” after that go to “general section” after that uncheck enable the steam overlay while in-game to disable overlay for that game. Again if you want to turn on this feature instead, you need to select this option.
How To Disable The Steam Overlay?
To disable steam overlay first you have to make sure that steam is open and make sure that you are logged in to your steam account. If you are not logged in to steam then you cannot disable your steam account and after that, you cannot multitask during the middle of the game. The steps t disable steam overlay is.
Step 1: Open Steam
Firstly open steam on your windows laptop or mac.
Step 2: Login To Your Steam Account
After opening steam login to your steam account to disable a steam overlay on your pc and enjoy the game without lagging.
Step 3: Click On “Steam”
Click on the steam option on the top right corner of the screen after logging in to your steam account.
Step 4: Select Settings
Once you click on the steam icon in the top right corner click on the settings icon once the down menu appears. If you are using a windows pc click on “settings” and “preference” if you are using a mac.
Step 5: Click On In-Game
After you taped on the settings option click on the in-game tab on the left of the sidebar.
Step 6: Uncheck “Steam Overlay In-Game”
You’ll see an option of “enable the steam overlay while in-game” uncheck that option. And after that, you can disable the steam overlay for all the games you have downloaded from steam.
Step 7: Click On “OK” To Confirm Changes
After unchecking the steam overlay in-game option click on ok and now test the game whether the game is properly working or not and check the performance of your pc.
After doing these steps you should t be able to open the overlay in the game. Once you have done these steps this will solve the issues of your game being cherished and pc working slowly and fix. The performance of the pc. Now check your pc and you are good to go for running games smoother.
Also Read: Play Among Us On PC.
How To Disable Steam Overlay For A Particular Game?
Yes, you can disable steam overlay for one game only also. If the steam overlay supports in your other games don’t get the fps dropping the games run smoothly. Your games don’t get crushed and it is not properly optimized for one game only then you can disable the steam overlay for one game only also. To do so follow the steps given below.
Step 1: Open Steam
Open the steam on or pc and mac to disable steam overlay for a single game only.
Step 2: Go To Steam Settings
After opening steam then go to steam settings for further process.
Step 3: Click On In-Game
Once you have clicked on steam settings select the in-game option to disable steam overlay for one game only.
Step 4: Untick “Enable The Steam Overlay While In-Game”
After you clicked on the in-game option you will see an option of “enable in-game option while in-game option. Untick that option so that you can disable the steam overlay while in-game.
Step 5: Click “ok”
After you have unticked enable the steam overlay while in-game. After following all these steps you can now enjoy the game without lagging and you can test the performance of the game.
Once you have completed all the steps you have successfully disabled the steam overlay for a particular game.
And here is how to play PUBG Mobile After Ban.
What Can You Do If The Steam Overlay Is Not Working?
Sometimes if you are not running the latest version of steam then your steam overlay doesn’t work properly and you feel like a bug or any virus has attacked your computer but some small mistakes can ruin the performance of your computer and your gaming experience.
- Run Steam as a client administrator
- make sure that you are using the latest version
To run the steam client as an administrator follow these steps:
Run Steam As A Client Administrator
Follow the below steps to run Steam as a client Admin.
Step 1: Right-Click On Steam Clients Desktop Shortcut
First right click on the steam client’s desktop shortcut.
Step 2: Open Properties
After you have right-clicked on the steam clients desk open the properties option.
Step 3: Choose Compatibility Tab
Once you have opened the properties section after right-clicking the icon select the compatibility tab.
Step 4: Check Run This Program As An Administration Box And Confirm Changes
After you choose the compatibility tab check and run the program as administrator box and confirm the changes.
Make Sure That You Are Running The Latest Version
Follow the below steps to make sure you are running the latest version of Steam.
Step 1: Open The Steam App
Open the steam app to check whether you are using the latest version of steam or not. Sometimes not using the latest version of the steam app may not work properly.
Step 2: Press On Windows Key
After you opened the steam app click on the windows key so that you can see many more options to fix the bug you find on your steam app.
Step 3: Click On “Steam Icon”
Once you press the Windows key you’ll see the steam icon on the left corner of the app. Click on that option to check for steam client updates.
Step 4: Wait Until the Updates Are Installed
Now you have to wait until all the new steam updates are installed and after you installed the new updates you can feel the new gestures and new home pages and new features of steam. And sometimes steam fixes their bug with the help of their updates.
Step 5: Restart The Steam
After you have installed all your updates you have to now restart the app so that you can now use the new features of steam and your bugs get fixed and use the latest version of steam.
Note: although the client updates on its own once you start it, you can always check for updates manually just in case something went wrong with the automatic updates
Update Windows
Sometimes you have to run the latest version of windows so that there is no problem regarding the steam account and you don’t have to get frustrated while gaming. To check whether you have the latest version of windows and to update your windows just follow these steps.
Step 1: Press The Windows Button
Press the windows button simultaneously. Or you can just click on widows+l.
Step 2: Go To Update And Security
You’ll see an option of update and security on the bottom left corner of your screen after pressing the windows+l key. Press on that update and security option to update the windows you are using now and use the latest version.
Step 3: Click On Cheak For Updates
After you selected the update and security option then you stay on the windows update page then from the right pane click to check for updates. After clicking this the pc will check for any new updates windows has and if yes then it will auto-update your windows to a better version.
Step 4: Wait Until The Process Is Done
Wait several times until the pc finds you have the latest version of windows or not and if you are not using the latest version of windows then wait several times so that your computer downloads and installs the latest version of windows.
After doing all these steps and still, you are facing problems with your steam overlay and your gaming experience is worst. There might be some bug virus or you might be using the beta version. The beta version is the incomplete or not tested application which is not compatible with all the games and you might be facing problems.
So be very careful before using the beta version of any application downloading games from a pirated site and be very careful it may damage your hardware and software.
How To Switch Back To Old Windows For Better Steam Overlay?
Even after the significant windows update again your steam overlay doesn’t work properly and if you are frustrated from the problem of steam overlay then you might get back to the old windows. Sometimes updating the windows makes the application not work properly.
So in that case you have to switch back to the old version, it will be smoother and your gaming experience will become better than the updated version. The steps form which you can switch back to your old
Step 1: Open Windows
Open windows on your pc or laptop by pressing the Windows icon on the left of your screen. Or you can open windows just by pressing the following keyboard shortcut: windows
Step 2: Go To Settings
After you opened the windows search settings on the search bar or just press the keyboard shortcut:windows+I to open settings.
Step 3: Tap On Update And Security
Since you have tapped on the settings option you’ll see an update and security option on your bottom-left side. Click on that option that will lead you to the next window which will help you forget your old version of windows.
Step 4: Click On Recovery
After you navigated to update and security on your left window pane you will see a recovery option click on that option. It will take you to the next page.
Step 5: Choose The “Roll Back To Previous Version” Option
As soon as you choose the “roll back to previous version” option the windows will close and your software will start downloading the old windows version. After that your laptop will restart as soon as your laptop turns back on then you will be having your old windows on your laptop.
After doing all the steps you can use your old windows. Even after updating your windows into the latest form and still. If your steam gets slowed and your game performance gets low then the best option is to disable your steam overlay.
How To Reinstall Steam Client?
The Steam client includes a digital storefront called the steam store through which users can purchase computer games. Once the game is bought, a software license is permanently attached to users. Steam accounts, allow them to download the software on any compatible device.
The reinstallation of the steam client may fix your bugs related to steam overlay and I can help you to gain more smoothness in your game and fluctuation of fps can be controlled.
Steps to reinstall steam client:
Step 1:Open Windows
Open windows on your laptop or pc just by pressing the Windows button on your pc or clicking on the windows icon on the left of your screen.
Step 2: Go To Settings
As soon as you opened the windows tab search for settings on the search bar or you will see a settings icon after scrolling for some time.
Step 3: Go To Apps
Go to the app’s icon on the right side of your screen after you clicked on the settings icon.
Step 4: Search Steam
Search steam in the search box or scroll down to s so that you can find the steam application. Open that application for the further process.
Step 5: Click On The Three Dot
After you find the steam application. Open the steam app and you will see a three-dot on the top right of your screen. Press that three-dot.
Step 6: Click On Steam
Click on the steam logo you will see an option steam overlay option enable the steam overlay option so that you can use the feature of the steam overlay.
Step 7: Click On The Download
As soon as you click on the steam logo you have to scroll down and click on the download option.
The installation process is done automatically by steam after your download is completed and you have to agree with some of the terms and conditions after that your installation process will start and you can use the steam overlay feature while gaming.
Open Steam Overlay
To open the steam overlay steam has a default key through which you can open the steam overlay. And you can chat, talk, and browse during the game but it is not optimized for the available games on steam. So it can decrease the performance of the pc and the game might freeze and lag at the time.
Frequently dropping fps is the major problem in that case you can turn off steam overlay and you can on whenever you want. To open steam. Simply hit the “shift+tab” button together while you are playing the game then the popup will show up. You can change the button according to you.
What Happens When You Disable Steam Overlay?
Disabling steam overlay can certainly give you a much-needed boost in average FPS went from 230-260 to a very steady 299 fps. It is a bit of a hassle, but if you’re on a bad PC. It could be the difference between 40-50 fps and 60-70 fps.
Also Read: 4 Minimum Requirements For Unreal Engine
Frequently Asked Questions(FAQs)
Some frequently asked questions related to the topic are taken from the internet.
Does Steam Overlay Cause Lag?
however, if your computer isn’t very powerful, opening the steam overlay during a game can cause heavy lag. Some users have also reported issues playing a certain game while the overlay is enabled. fortunately, you can disable the steam overlay directly from your steam app.
Does Disabling Steam Overlay Improve FPS?
Disabling steam overlay can certainly give you a much-needed boost in average FPS. I went from 230-260 to a very steady 299 fps. But it depends upon the performance of the pc.
If your pc is the low end then you can find lag or drop in fps even after you disabled the steam overlay. So make sure that your computer has good specs.
Why Is My Steam So Laggy?
The accumulation of steam browser data is one factor behind steam running slow. The game client software includes its integrated browser with which users can browse the steam store. Lots of steam users have confirmed that clearing the software s web browser cache and cookies fixes the issue.
Do Overlays Cause Input Lag?
I see that a lot of people were having issues with both live matches and overlay not working. I finally got my overlay to work by unchecking the “disable fullscreen optimizations” checkbox in the advanced settings of mordenwarfare.exe.
How Much Ram Does Steam Use?
Steam mostly takes very low space in your RAM. The minimum requirement to run steam is that you must have a 2.3 GHz intel core 2 duo or better. 512 MB RAM.
Conclusion
After reading this article we hope that all your doubts and problem related to steam and steam overlay has been solved. From reading this article we guess that you are able to use steam properly. All your doubts pertaining to steam overlay the problems that you are facing on your pc. And steam is gone and you have a fantastic time playing games and getting a better fps on your pc.
This article guide you to properly disable the steam overlay. And how to constantly get good fps on your pc.