Rackspace Webmail is one of the leading Email Hosting Service Provider Company that offers paid email account on their own domain name for businesses. Today in this article we will be learning about the Rackspace webmail service: Rackspace webmail login, sign up, Rackspace email settings, and how to recover/reset Rackspace password.
History of Rackspace
Rackspace is an American Managed Cloud computing company that is based in Windcrest, San Antonio, Texas.
The company, Rackspace, was started 24 years ago by Richard Yoo, in the year 1996 as a small Internet Service Provider (ISP) called Cymitar Network Systems. The service that the company offered was basic internet access and web hosting. Later in 1997, in collaboration with Dirk Elmendorf the company was reformed as Cymitar Technology Group. The company also grew to development of internet applications.
Later in 1998, Patrick Condon joined the company and in the same year, in the month of October, they launched Rackspace.
Rackspace Webmail Service
Rackspace started its webmail service in 2001 through the privately held company Webmail.us and its data centers operate in Texas, Virginia, Chicago, Kansas City, United Kingdom, Germany, Singapore, Mexico, and Hong Kong.
Once you sign up and log in to Rackspace webmail, you have access to all of their resources.
So, in this article, we will be guiding you on how to sign up and log in to the Rackspace Email account. The procedure is a step by step and is simple to follow.
Creating Rackspace Email Account | Rackspace Webmail Sign up
In order to access the Rackspace webmail login page, first, you will need to create an account for the Rackspace email account. You can also use your Rackspace email account with other webmail services using their SMTP, IMAP and POP settings which we will be discussing later on this article.

First, let’s create an account on Rackspace Webmail with the help of steps down below.
- Open your browser, and go to Rackspace Homepage.
You can navigate to their homepage through this link: https://www.rackspace.com/ - Now, click on the “login” button which is on the upper right corner of your homepage. You will be redirected to a new web-page that contains the login dashboard of its different services.
- Next, click on the “login” button under the Rackspace Webmail Login option.
- Next, the login form of the Rackspace Webmail account will open. On this page, locate “Hosted Email” that is right below the login form. Click this link to access the Hosted Email.
- Once the Hosted Email page loads up, click on the “Begin Free Trial” button on the navigation bar (not the menu bar) of the page.
- Now, you will be redirected to a new page where you have to fill-up the form to set up your Rackspace webmail account.
The Rackspace webmail sign up starts with choosing your app to create an account to Billing Information to confirmation.
Choose your apps Tab: Here choose which service you want: Rackspace Email or Rackspace Email Plus.
Create an Account Tab: Here you will need to enter your detail, the domain you want to get, your personal details and Rackspace Webmail Login Credentials.
Billing Information Tab: In order to provide your payment detail.
Confirmation Tab: To confirm in order to create a Rackspace webmail account. - Finally, confirm your account and your account will be successfully created.
Rackspace Webmail Login
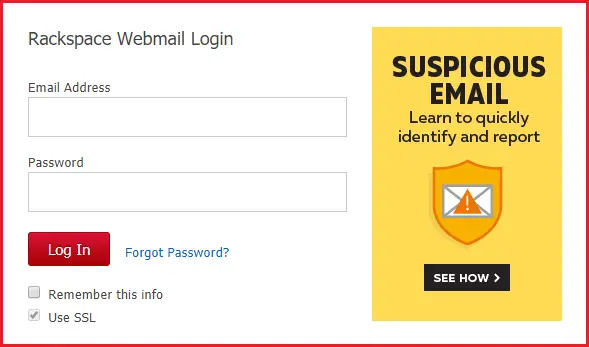
Once you have created an email account with Rackspace here is how you can successfully login to your Rackspace email account.
- Open your browser, and go to Rackspace’s official Homepage.
- Now, click on the “login” button which is on the upper right corner of your homepage. Tapping on the login button, you will be redirected to a new page that contains the login dashboard of its different services.
- Now, click on the “login” button which is under the Rackspace Webmail Login option. Check the link: https://apps.rackspace.com/index.php. Next, you will be redirected to the Rackspace webmail account login form.
- Now, enter your credentials in the Email Address and Password field which you have created while signing in with Rackspace.
- Finally, tap on the “Login” button to log into your Rackspace Webmail account.
How to Reset your Rackspace Webmail Login Password?
Probably Rackspace webmail is not the only webmail service you use. You might have other accounts that need a password to log in right? And remembering all the passwords is not possible and you forget your Rackspace webmail login password. In such a case you will need to reset it to get access again. So, here in this section of the article, we will be looking into how to reset and recover your Rackspace webmail password.
- Open your browser and go to the Rackspace webmail login page. Follow the three steps mentioned above. Or click this link to directly access the login page of Rackspace webmail: https://apps.rackspace.com/index.php
- Now, click the “Forget Password?” link which is right next to the Log In button.
- Next, you will be redirected to a new page containing a field to enter the Email address that you used to create your Rackspace webmail account.
- After that, enter your email address in the field and click on the “Next” button.
- Now, Rackspace will send you an email to your account that you used to create a Rackspace account. So click on the reset password link inside your mail inbox.
- Next, enter your new password and then confirm the password to create a new password for your Rackspace account.
Note: Make sure you use a strong password. A password with a minimum of 14 characters that use all the upper case, lower case, special, numerical characters is considered as a strong password. - Finally, click on the reset password button and your password to log into the Rackspace webmail will change.
Rackspace Email Settings
Here are the Rackspace email IMAP, POP settings and SMTP settings that will help you setup your Rackspace email account with any of the popular email clients.
POP Settings for Rackspace Email: Incoming Mail Server Detail
Account type: POP
Username: Your Rackspace email username (example: [email protected])
Password: Your Rackspace email account’s password.
Server hostname: Here I am using Gmail, so it’s, pop.gmail.com
Server Port: 995
Required Authentication?: Yes, your Rackspace email id and password.
SSL/TLS: Yes, secure.emailsrvr.com
IMAP Settings for Rackspace Email: Incoming Mail Server Detail
Account type: IMAP
Username: Your Rackspace email username (example: [email protected])
Password: Your Rackspace email account’s password.
Server hostname: Here I am using Gmail, so it’s, imap.gmail.com
Server Port: 993
Required Authentication?: Yes, your Rackspace email id and password.
SSL/TLS: Yes, secure.emailsrvr.com
SMTP Settings: For outgoing email
Account type: SMTP
Username: Your Rackspace email username (example: [email protected])
Password: Your Rackspace email account’s password.
Server hostname: Here I am using Gmail, so it’s, smtp.gmail.com
Server Port: 465
Required Authentication?: Yes, your Rackspace email id and password.
SSL/TLS: Yes, secure.emailsrvr.com
Rackspace Email Settings for IOS
Tointegrate Rackspace mail with your IOS then follow the steps down below.
- Click on the Mail from the Settings which is on the home screen of your IOS device.
- Now, Tap “Add Account“, then, Tap Other and finally Add Mail Account.
- Next, enter the following in the fields that are provided. Name – The name will appear in the “From” field of messages you send. Email Address – Enter your entire Rackspace email address (e.g. [email protected]). Password – Enter the password for your Rackspace email account. Description – This description will only be visible to you.
- Select IMAP and then add both the Incoming and Outgoing Mail Server information:
HostName – secure.emailsrvr.com
Username – Enter your entire email address (e.g., [email protected]).
Password – Enter the password that you use to login to your email account. - Finally, tap on the “Save” button to save all the settings.
Now, this way you can easily use the Rackspace mail on your IOS device.
Rackspace Email Settings for Outlook
Here are the steps to integrate your outlook/hotmail webmail for using your Rackspace mail:
- Log in to your Outlook account using your outlook username and password.
- Now, click on the “settings” option which is on the mail screen.
- Click on “Connected Accounts” which is Under options.
- Now, Under Add a connected account, click other email accounts
- Here, enter your Rackspace email ID and password
- After that, click on the “Ok” button.
- Now, choose the IMAP connection.
- Finally, click the “Ok” button to integrate your outlook account for using your Rackspace Email.
Rackspace Email Settings for Thunderbird
Here are the steps to use Mozilla Thunderbird for accessing your Rackspace Emails:
- Open your Mozilla browser and go to Account Settings. Here is what you have to do to get to account settings. Settings>Options>Account settings
- Now, Select the Email account that you want to use to integrate your Rackspace email. Then click on Next
- Enter your name and e-mail address in the field provided.
- For the incoming server, select IMAP and use secure.emailsrvr.com
- Next, enter your e-mail address for the Incoming User Name and Outgoing User Name.
- After that, click on the “Next” button.
- Enter a name for your email account [email protected]
- Again, click the “Next” button.
- In Account Settings, select Outgoing Server listed below your new account
- Type secure.emailsrvr.com for the Server Name and change the Port setting to 465
- Select username and password and enter your e-mail address.
How to Secure Password for Rackspace Webmail Login?

What does it take to create a secure password for your Rackspace webmail login? Here is your answer. To secure your password, your password needs to have these characteristics.
- Make sure your password has a long-phrase/more characters in it. A password of a minimum of 12 to 14 is considered as a secure password.
- Next, to create a password use numbers, characters, special characters, symbols, upper case, and lower case characters in your password. A password that as a minimum of 12 characters with all of the mentioned characters is harder to crack than a password with six characters.
- Never use your personal name or business name or any dictionary word in your password. For example, “house, my house” is very bad for the password.
- Never-ever share your password with anyone; or store your password in a file.
- Use a tool to store your password like the keypass. Here you will have to store your password in a directory inside the software, but to get access to the directory, you will need a master passcode.
- Always create a different password for all your login accounts.
- Do not tell your password to anyone. Not even to your close friends.
- Change your password one in a week and avoid reusing a password for a year, at least.
- Then what might be a secured password: “Iw!llN3ver5#areWYp@$$w0rb” – I will never share my password.
Conclusion
There you go, I have tried to make it simple of you to understand about Rackspace email login help. We learned to create an account, log in to your Rackspace webmail account, use your email account with other webmail services, how to recover or reset your Rackspace password and how to make your password strong and secure.
Please leave us your feedback after going through our article, this way, we will be able to provide you guides in a simple way possible. Also, travel through our other online related guide on Online Help Guide.
Thank you!

