Google Chrome is a popular and widely used browser all over the world. The vast majority of the users considered Google Chrome as a reliable, high-speed, stable, and trustworthy browser. But it doesn’t mean that Chrome can’t have any issues or can’t go wrong in any circumstances. It is software just like others, so it also can malfunction or crashes over time. Recently, multiple users reported that their Google Chrome is not responding or freezes, or won’t open in Windows 10. So if you are facing the same problem as other Windows users, then this article will walk you through the simple methods to fix Google Chrome’s not responding issues in Windows 10.
Most of the time chrome issue arises when you upgrade your old Windows. The same issue start arises in April 2018, when Chrome first faces a not responding error due to a new update in Windows 10. Those issues are also known as a bug for Microsoft. Not only that, if the chrome users also open multiple tabs inside Chrome, then users may face 100% disk usage, results not responding or hang in Google Chrome.
The problem can be solved just by restarting the system if only it’s a temporary problem that appears for the first time. But if you are facing Chrome not responding issues each and every time whenever you try to open your browser, then you need some other solutions. Problems can occur; it’s fine, but you don’t use the right solution, then it will make you frustrating. It’s necessary to be methodical when it comes to fixing the issues.
So, let’s move to the simple methods down below to fix Google Chrome not responding on Windows 10. But before we move, take a closer look at other reasons why Chrome keeps freezing, crashing, or not responding.
Reasons Why Google Chrome Is Not Responding
Even though Chrome is considered the best browser, it does have some drawbacks. Users find not responding/crashing/freezing/hangs/not working/not opening while using Chrome. There are several reasons for these kinds of error, but the most common reasons are:
- Low RAM
- Outdated Chrome
- Issues with Windows System Files
- Multiple Installed Extension
- Overloaded with browsing history, cookie, and cache
- Malware or Antivirus
- Proxy Settings
It’s not necessary that all these reasons are responsible for your Google Chrome errors. Maybe one or two reasons might prevent Chrome from crashing or not responding.
If you find the right solution for the above-mentioned reasons, then it’s good for you and your PC; otherwise, it always keeps you in trouble either one way or another way.
That’s why we are hereby bringing the best simple methods to overcome Chrome not responding issues in your Windows 10.
How to Fix Google Chrome is Not Responding on Windows 10
Now, you know the reasons behind Chrome not responding after going to the above paragraph. So it’ time to take the right methods to get rid of those chrome problems in Windows 10.
Okay, let’s get started.
Update Your Google Chrome
The first thing which you need to do is update your Google Chrome. Why? Well, if your Chrome is outdated then you might face the Chrome is not responding error message. That’s because when your browser needs the latest version, then it will stop supporting the old one. So keep your Chrome up to date.
Let’s see how you update your Google Chrome to its latest version.
- Open Chrome, click on the three dots located in the upper right corner of the browser.
- Now, look to the bottom of the drop-down menu and click on the Help section.
- After that, choose the About Google Chrome option inside the Help menu. It opens the settings page of Chrome.
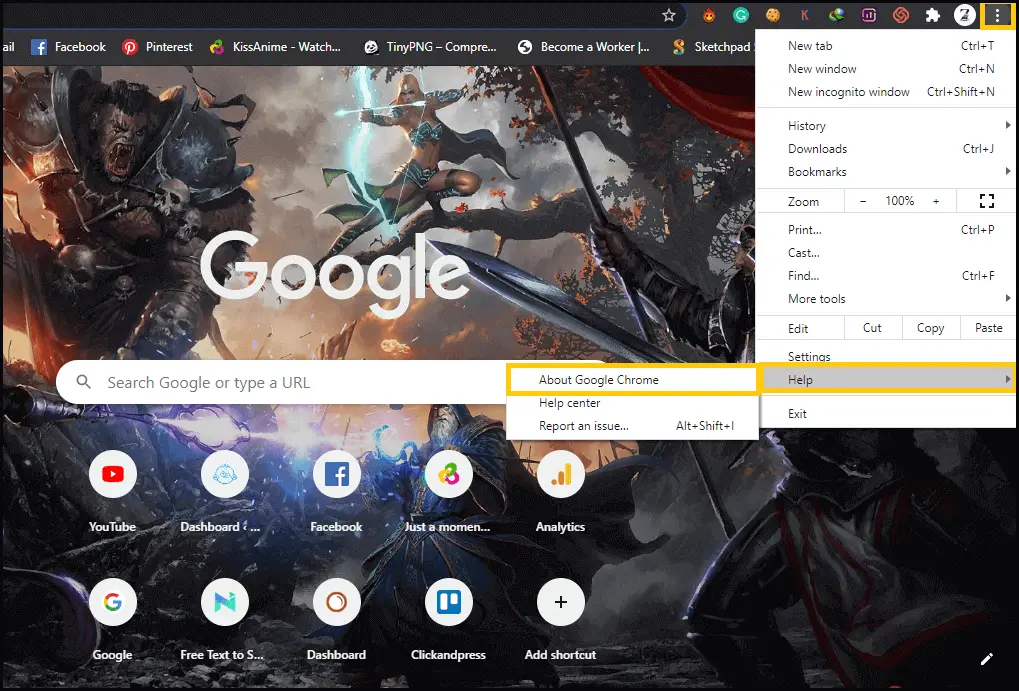
- Now, Chrome will automatically look for the latest version. And if the new version is available, then you can start to update.
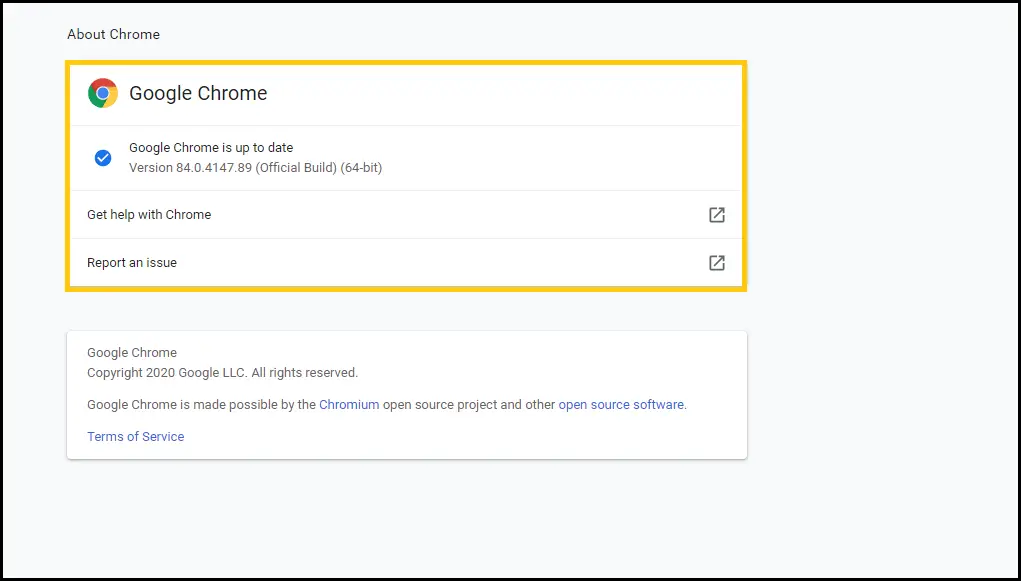
- Wait until the completion of updates, and after that, restart your Google Chrome.
Now, see whether your problem is solved or not. If not, then move to another step down below.
Clear Cookies and Cache Files
Clearing the cookies and cache can also solve the Chrome issue in Windows 10. Once the cookies and cache are cleared, then your Chrome will start to run smoother than before; in other words, you will not find any not responding error.
Besides, when Chrome has too many browsing histories and cookies or cache, then it’s too much for your browser to handle. That’s because it fills up your disk space and the computing power. So when you clear it, then it will solve the problem regarding the loading issues and more.
So let’s see how to clear the cookies and cache of Google Chrome down below.
- First thing first, open your Google Chrome Browser.
- Now, press Ctrl + H for a shortcut that directly opens the browsing history of Chrome.
- Click on the Clear browsing data located on the left side of the screen.
- So on the Time Range section, choose the ALL time option instead of the last 24 hours.
- Once done, then tick on all the available options (Browsing history, Cookies, and other site data, Cached images, and files).
- Click on the Clear data button to end the process.
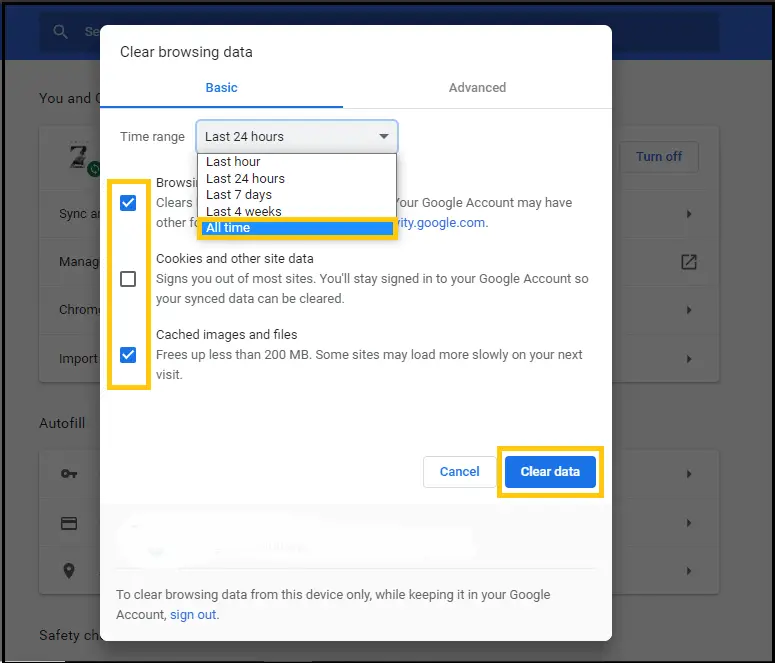
- Finally, restart your Google Chrome.
After all, done, once again check if the problem is solved or not. If you are still getting the same issues, move to another step.
Turn-off Chrome Extensions
When you have too many extensions in your Chrome, then you might have to face the Chrome not responding error message. That’s because sometimes you may have some fault in your installed extension. Besides, if you also add an unwanted extension in your Chrome, then it can attack your chrome database and lead to issues.
So what can you do in such a situation? Well, the best option is to either turn-off or remove all unwanted installed extensions from your Chrome. If you have an extension which you are not using these days, then it’s better to remove it. Besides, you can also turn-off all the extensions and enable one by one to see which extension is causing the problem.
So here’s how you can turn off or remove the chrome extension in Windows 10.
- Open your Chrome and click on the 3 dots located at the upper right side of the screen.
- Now, choose the More tools option and then click on the Extensions one. After that, it takes you to the chrome extension page.
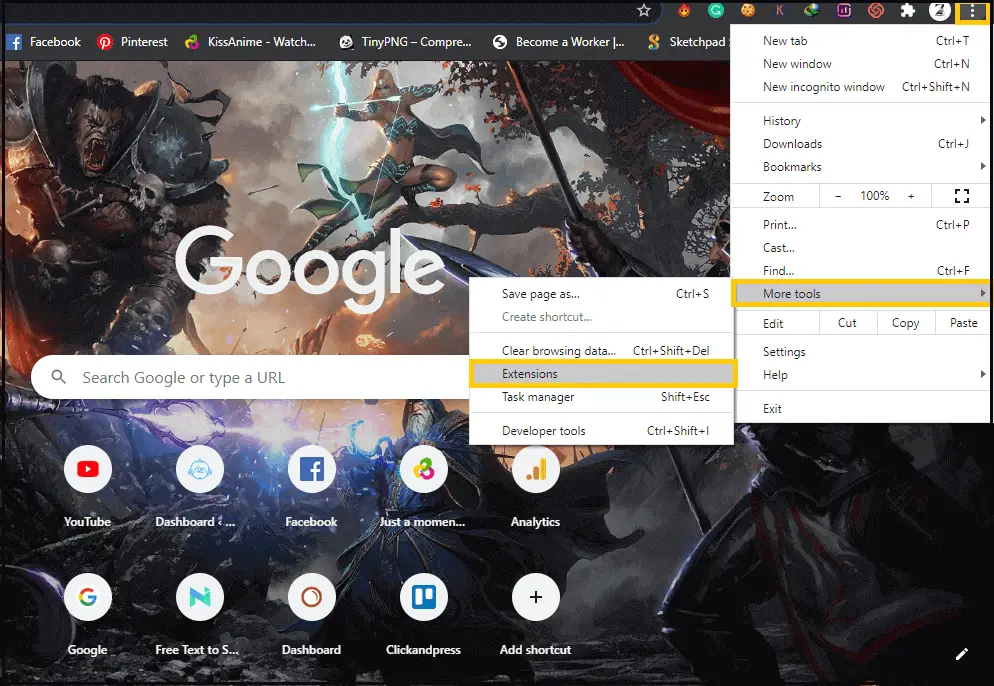
- So choose the extension which you are not using anymore. Once you are done, click on the remove button to delete the unwanted extension.
- Now once you delete the unwanted extension, it’s time to check which extension is causing the problem. So toggle off all the extensions and restart your Chrome.
- After that, one by one, enable each extension and restart Chrome. Follow the process to all the disabled extensions and see the corrupted extension. Once you locate it, delete it from Chrome and again restart the browser.
Note: Don’t install that extension again, which causes Google Chrome is not responding the error. If you really want that extension, then choose the alternative of that extension. So this way, you won’t face the same problem once again in your Windows 10.
Allow Your Chrome Through Windows Firewall
If you see Chrome is not responding to issues in Windows 10, then it also might be caused by your Windows Firewall. You might be wondering how? Let’s get clear with an example.
Windows Firewall is designed to protect your computer from unwanted malware. So basically, sometimes it finds some unusual data in your Google Chrome and thinks it like malware. After that, it automatically blocks the software from opening. Besides, even though you are able to open the software or let’s say Chrome, then it will not work properly.
In that case, you have to let your Firewall allow the Chrome Browser in your Windows 10. For that, you have to add your Google Chrome Browser to the Windows Firewall.
Let’s see how you can do it.
- In the Windows search bar, type Windows Defender Firewall and press enter.
- Click on the Allow an app feature through Windows Defender Firewall, which takes to another section.
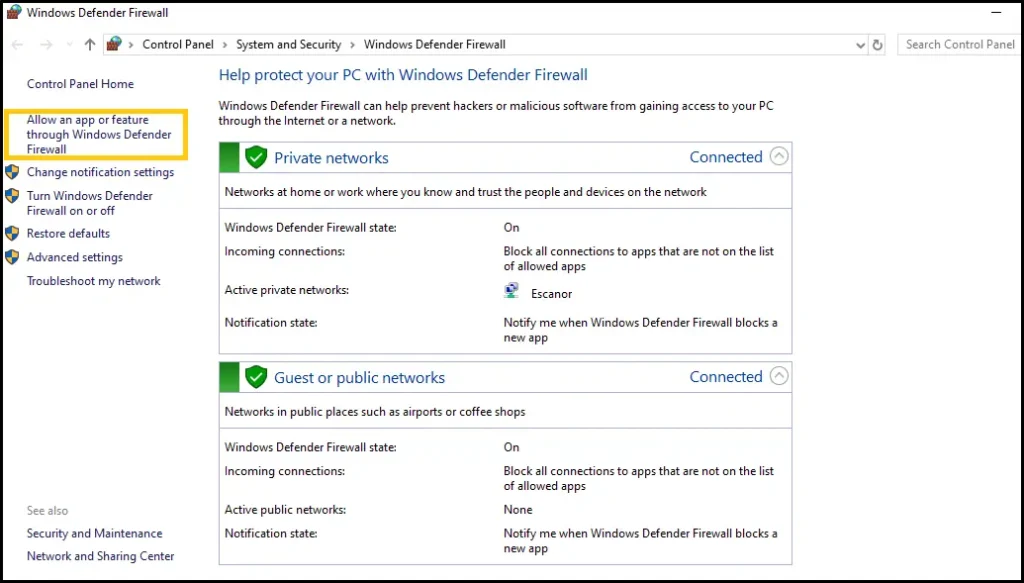
- Now, here search for Google Chrome, and once you find it, then tick on that including on its Private and Public.
- After that, click on the okay button down below and exit the Firewall.
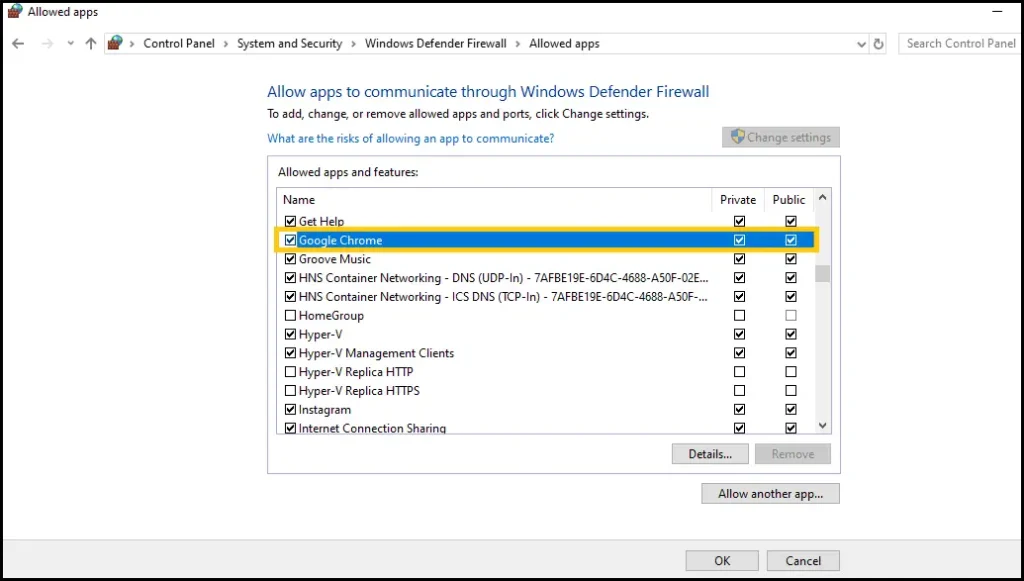
- Now, restart your chrome browser and check if Chrome is not responding issue has been solved or not.
If this method fixes google chrome’s not responding problem on your Windows 10, then it’s good for you, but if not, then move to another step down below.
Clear Your DNS Cache
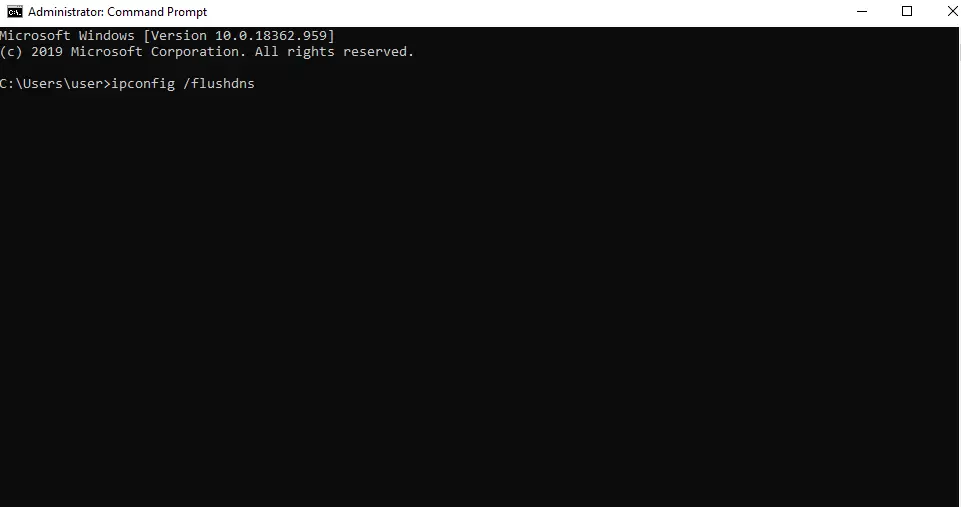
Your DNS cache could be another reason that is messing with your Google Chrome. If the DNS cache is full or corrupted, then it won’t let your chrome browser access the internet. Hence, you will see Chrome not responding to error messages in Windows 10. So if you don’t want to see that message again, then clear your computer DNS cache to fix the issues.
So to make sure your computer DNS cache is not the one that causes the chrome issues, follow the simple down procedure.
- Open the Command Prompt (CMD) from the Windows search bar. Remember to open it using run as administrator.
- Now once you into the CMD screen, you have to type two following commands:
ipconfig /flushdns and Netsh Winsock reset. - Type the first command and then press enter. Once done, again type the second command and press enter.
- These two commands help to flush your DNS cache and help to reset your IP. So, after all, done, once re-launch your chrome browser.
Now, check the error whether you are still getting it on your Windows 10? If yes, then again move to another step.
Run SFC and DISM Scan
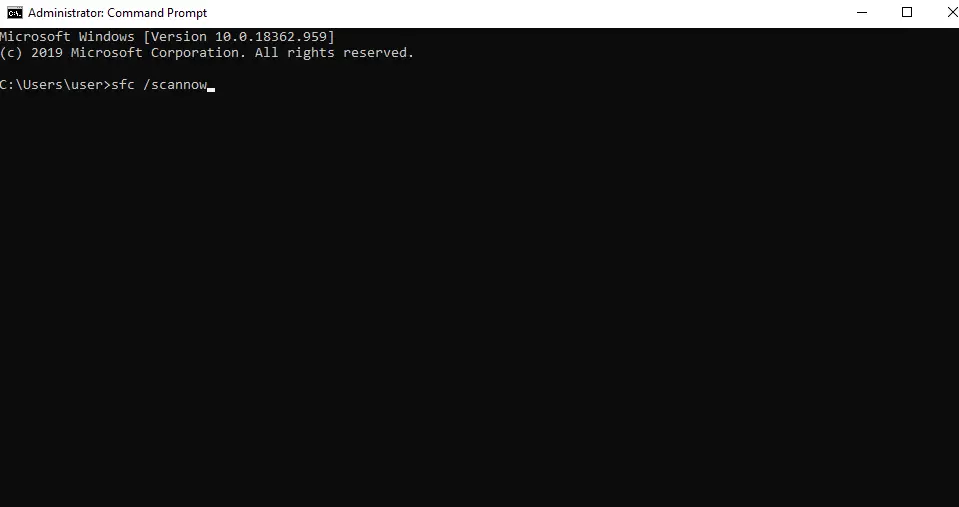
Another method that you can use to solve Chrome’s not responding issues is to run the SFC (System File Checker) on your PC.
So how does the SFC scan do the work? Well, we need to run the SFC command in the command prompt (CMD). When we start running the SFC command, it scans all the protected files on your computer. If it finds any corrupted files through the scan process, it automatically replaces that file with a cached copy. This scan process also helps fix your chrome browser error if the issue is because of the system file error.
Now, let’s see how we can run the SFC command in Windows 10.
- Open your Command Prompt (CMD) from the Windows search bar. Always open the CMD in a run as an administrator.
- When you are in the CMD black screen, type the command sfc /scannow, and press enter.
- After that, wait for a couple of minutes to complete the scan process. And don’t interrupt the scan process until it fully completes.
- Once the scan process is completed, then restart your computer.
That’s all you have to do with this method. So now check whether you are getting the same chrome problem. In some Windows 10, the chrome issues can be solved by applying this method. But if it didn’t work on you then, maybe the SFC scan didn’t fully solve the Chrome not responding issues.
In that case, you may need to run the DISM (Deployment Image and Serving Management). This process is kind of similar to the SFC scan that also scans and fully repairs the Windows issues that impact your system files. So we can say it’s an upgrade version of SFC – if SFC didn’t successfully scan the system files, then DISM will do the job.
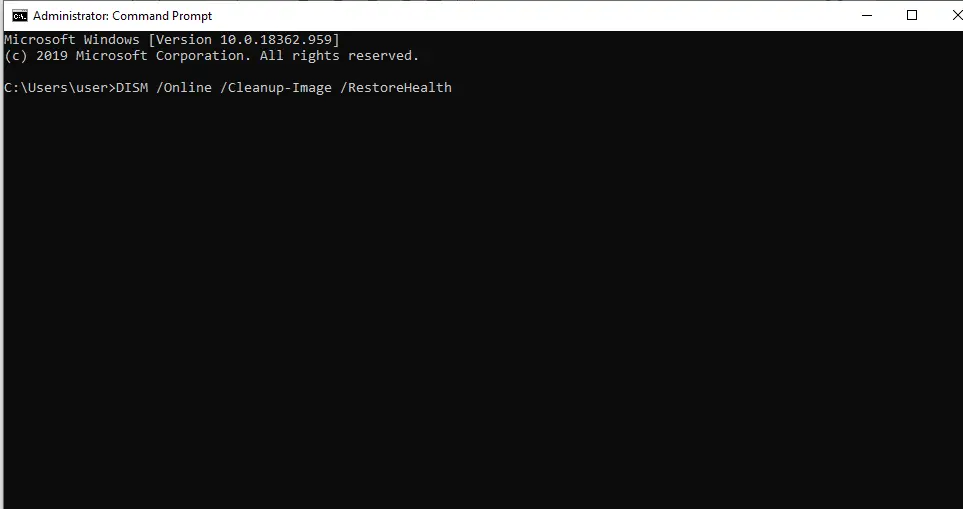
So, let’s move to the simple steps down below.
- Once again, open your Command Prompt (CMD) in a run as administrator.
- So in the CMD screen, type the command DISM /Online /Cleanup-Image /RestoreHealth and hit enter.
- Now, wait for a couple of minutes and let it finish the full scan.
- Once the scan successfully completed, then again run the SFC scan. You can follow the above steps for that.
- Finally, restart your computer after all the process is completed.
Now, so this is how you can fix Google Chrome not responding on Windows 10.
Disable Proxy in Windows 10
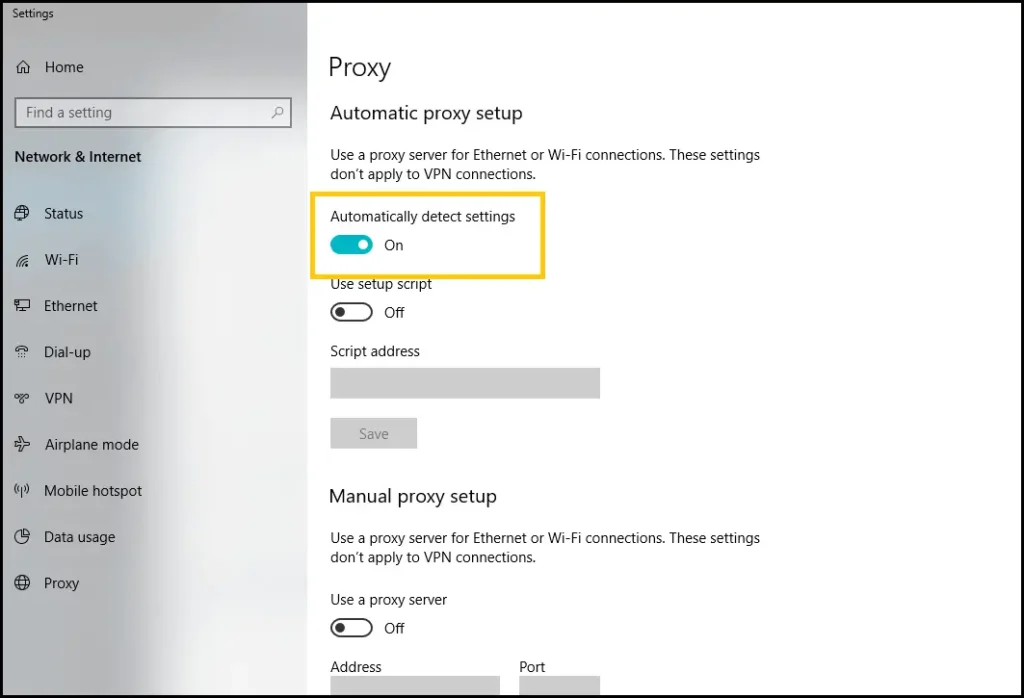
If you have enabled the proxy server in your Windows 10 then it also might be the reason for your Chrome not responding issues. The proxy server is the gateway between your PC and the internet. It provides various levels of security, functionality, and privacy on your computer.
Sometimes your proxy server can mess with the proper connection that also affects your chrome browser. So there all you have to do is disable the proxy server in your Windows 10 if it was already enabled.
The steps are straightforward to disable the proxy server. So let’s get into it.
- Go to the Windows search bar located at the bottom left side of the screen.
- Now type Proxy Settings and press enter. This step directly takes you to the main proxy settings of your Windows.
- So there disable the proxy under the automatically detect settings.
That’s it; with the help of the above 3 steps, you can easily disable the proxy. Now, see if your chrome issues are solved nor not? If you still face the same, not responding problem, then move to the next method.
Also Read: How to Reinstall Windows 10 Without Losing Any Files
Reinstall Your Chrome
If all the other options failed to fix Chrome’s not responding issues in your Windows 10, then reinstall your Google Chrome. When you reinstall your Chrome, then it means you get rid of old faulty chrome problems.
But before starting the reinstall process, make sure you connect the Chrome browser to your Google Account. You might be thinking, why? Well, if you link your Chrome to Google, then it will save your entire bookmark, saved password, theme, and more. Later on, when you install the new Chrome, then you can start the sync process to get it back.
Now, let’s move to the down steps to reinstall Chrome.
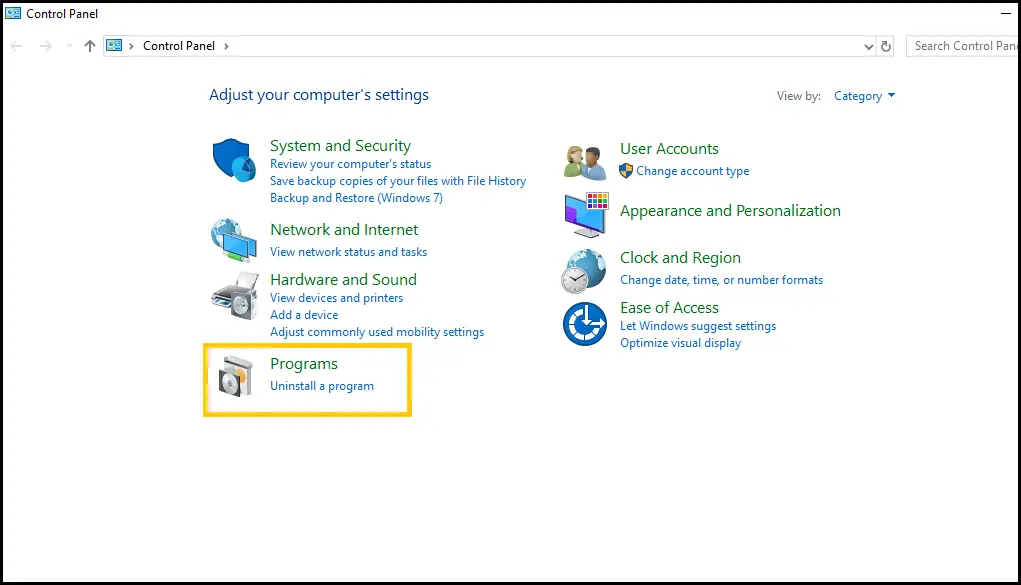
- Open the control panel from the Windows search bar.
- Now, click on the Uninstall a program option under Programs.
- After that, locate Google Chrome and click on that. Now, in the top section of the control panel, click on Uninstall/Change.
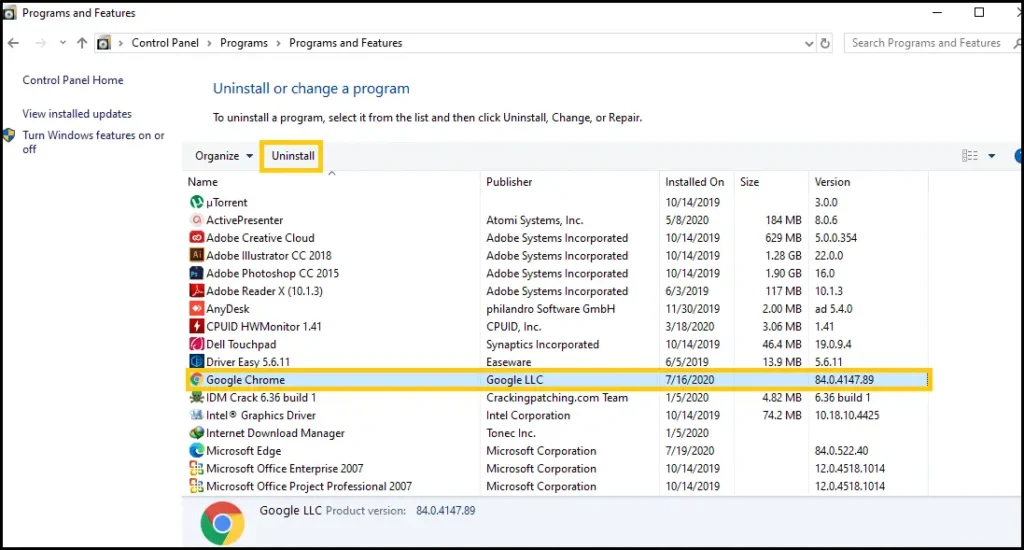
- Wait for seconds until it completely removes the Chrome from your computer.
- Once it fully removed, then go to the default Windows Internet Explorer.
- There open Google and download the latest Chrome.
- Once the download is completed, install Chrome.
So this way, you can reinstall Chrome from your computer. Now check the chrome issues in your Windows 10. This time the Google chrome not responding issues is definitely solved. So these are the steps to fix Google Chrome not responding on Windows 10.
Why Does My Computer Freeze When I Open Google Chrome?
The issue regarding your computer freeze when opening Google chrome is because of low RAM. It often happens if your PC RAM is low because Chrome uses high memory usage. Besides, it also may crash your website if it always keeps freezing.
So if you want to get rid of the computer freezing problem, then you can add extra new RAM or try another browser. Besides, if you love Chrome and don’t want to shift to another browser, then you can close the entire tabs which you are not using on Chrome. Likewise, you can also close the programs which are running in the background on your computer.
However, if your Google Chrome freezes instead of your computer where it won’t let you close the browser, then press Ctrl + Shift + Esc to open the tab manager and then close the Chrome. You can also press Shift + Esc inside the chrome and end process if your other tabs are freezing.
Why Does Google Chrome Keep Closing?
If your Google Chrome keeps closing, then it’s possible either the malware or your antivirus software prevents Chrome from opening. So if you have an antivirus, then check whether it’s blocking Chrome or not. It usually happens when the antivirus detects any unusual behavior in your Chrome.
Conclusion
Google Chrome is still the best choice for users when it comes to the browser. But sometimes, it will lose track and start to show weird behavior. So at that time, you have to find the right solution to keep Chrome back again on the proper track.
Besides, if you don’t want to face any issues regarding Chrome – also Google Chrome not responding on Windows 10, then there are a couple of things that you must implement. Do not leave your Chrome outdated; clean your browsing history, cache, and cookies from time to time. Likewise, also make your computer free from the virus; this means scanning your PC with Windows Defender or installing a good antivirus.
So are you able to fix Google Chrome not responding on Windows 10, following the steps mentioned above? Let us know in the comment section11 below.
Thanks for reading our article.

