Most of the time, do you forget to wish your partner about their birthday? Or do you forget to wish your anniversary? Worry not, Gmail has your back now. On the 15th birthday of Gmail, Gmail announced that they would include a feature to their webmail where one can schedule their email. And they did it; now, with Gmail’s new feature, you can schedule your email and send it late. However, this feature is available on the Web-version and Mobile app version Gmail.
Previously we had to use a third-party add-on to schedule sending emails. This third-party add-on had opened up the door for the risk of hacking and data manipulation. Thankfully Google mail added these features in their webmail.
So, if you haven’t used the schedule feature by Gmail, you are missing out on their most significant update. The scheduling tool does exactly as it says. Without having to save an email on draft to send it later on, you can write an email and schedule it to the data and time you want to send the email, and Gmail will do the job of sending the mail for you. With Gmail’s scheduling feature, you can schedule your email up to 49 years in advance. (This is a great way to wish someone happy birthday or wish your spouse anniversary each year.)
Before Gmail introduced this feature, users had to use Boomerang (an extension for Gmail) to send scheduled emails. Now the function is right into your Gmail without having to use any plugins. You can have up to 100 Scheduled emails at a time.
Steps to Schedule Gmail Message
- Open your web browser and go to Gmail.com.
- Now, sign in to Gmail with your email id and password.
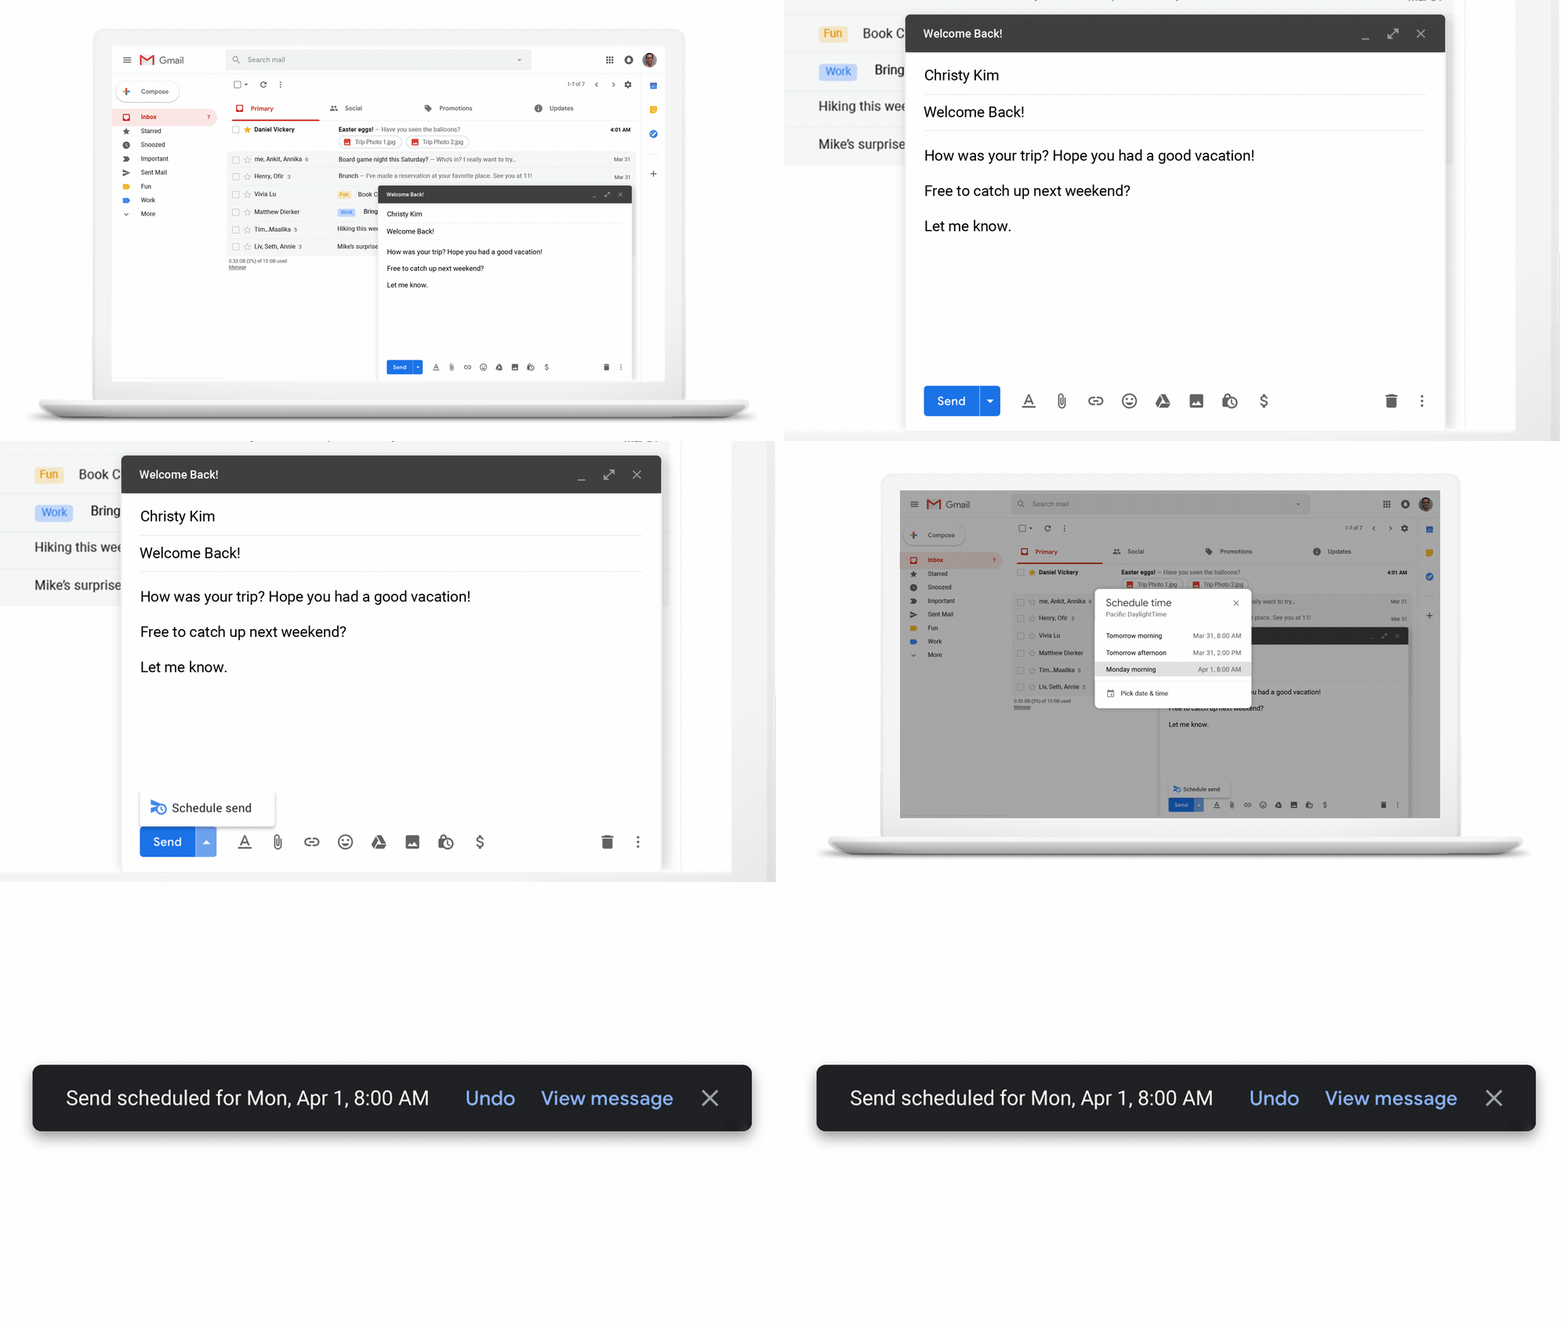
- Now click on the + Compose Button to open the form to compose your email.
- Compose your email like you usually would.
To: is the section where you type the receiver’s email
Subject: to type the subject of your email and
Message body: where you type your message.
In this example, I am going to write a Birthday Wish email to one of my friends whose birthday is on Jan 1, 2020, And today is Dec 9, 2019. - Next, click on the Drow-down arrow right next to the Send button on your email compose box.
- Then, from the drop-down menu, Select Schedule send. This will open a dialogue box where you get to choose the date and time.
- From the Schedule send dialogue box, select the desired time and date by clicking on the Pick date & time option.
- Now, select your date and time and select the Schedule send button.
- Finally, you will receive a pop-up message on the button left corner of your screen that says, “Send scheduled for……” If you made any mistake, you could click on undo if you have made any mistake or want to view the message once again.
Schedule Gmail Message From Gmail App on Your Phone or Tablet
The process of scheduling your emails on the app is similar to the Gmail web version. Instead of clicking the drop-down menu next to the send button in the web version, you need to click the three dots in the top right corner of the screen. So, if you are using your app to send an email there, here is how you can enable the email schedule feature in the Gmail app.
- Launch your Gmail App.
- Click the Compose icon on the bottom right corner of your app, the Plus + icon.
- Now, enter the recipient’s email address, the subject of your email, and the message.
- Next, in place of sending the email right away, tap on the three vertical dots on the upper right corner of your screen.
- Now, from the drop-down menu, tap on the “Scheduled Send” option, which is probably on the top of the option. This will open a pop-up dashboard on your screen.
- From the pop-up dialogue box, tap on the date and time that’s already there, or you can pick a date and time yourself. So, tap on the Pick date & time option from the menu.
- From the Pick date & time dialogue box, select date and time using the drop-down menu.
- Now, tap on the Schedule send button to save your scheduled date and time.
- Finally, a message will appear on the bottom of your screen that contains “Send scheduled for….” you can undo to un-send the email. This will save your email to the draft folder of your Gmail. Or tab on the message to view to message and make changes.
Where Are the Scheduled Emails and How to Update or Delete Scheduled Emails in Gmail?
Now, what if you scheduled an email to send it later, and you got to change your message body? What if you decide not to send the email before the scheduled time? With Gmail’s schedule features, you can edit, update, or delete your scheduled emails. All the scheduled emails are stored in a folder named “Scheduled” before they are sent to the recipient. So, to Update your email schedule, follow the following steps.
Gmail Schedule Update using Gmail App
- If you are using your Gmail app version, tap on the hamburger icon on the top left corner of your screen to open up the menu.
- Scroll down the menu if you have to and tap on the Scheduled option/folder from the list of options.
- Next, all your scheduled emails are listed on your device screen.
- To update your email, click the email you want to edit and edit your email from the message body.
- Next, to delete the email, tab the email and click the delete icon on the top navigation bar of the compose email box.
- To send the email right away, long-press the email until it is selected. And now, tap on the Mail icon on the top navigation bar.
- If you want to remove the schedule and save it as a draft, long-press the email to select the email, then press the cancel send button from the navigation bar.
There you go, you have successfully updated your scheduled email. Now let’s take a look at how you do it using the web-browser.
Gmail Schedule Update using the Web Browser
- Similar to the mobile version Gmail, click on the Scheduled folder on the mail menu.
- Now hover your mouse over the email you want to edit or delete.
- Now, click on the bin icon to delete the email, or clock icon to snooze your mail.
- Click on the email to make changes.
- And to cancel the email schedule, click the checkbox in front of the email. And click on the Cancel send button from the navigation bar. The email will be moved to the draft section of your mail.
Conclusion
There you go, now you have an idea on how to enable email schedule features in Gmail. Now you can quickly take action on emails. Just write your email like you usually would and schedule your email to be sent on the date and time you want.
Whether you are using a web browser or an app, try the above method to schedule the message on Gmail. And if you have any queries regarding the article then leave a comment in the comment section down below. We love to hear from our viewers. Also, do visit our site Online help Guide for more Gmail related article, Who knows you might find the solution regarding Gmail on our article.
Thanks for getting in touch with us.

