Have you ever been in a situation where your Windows 10 network devices fail to provide their right connection? Your wireless connection automatically fails to provide service even though you have an internet connection. Even the same problem also occurs in other networking devices such as Bluetooth, VPN, and Ethernet. You don’t know how it does happen and start searching for the solution. The only solution left for this scenario is to reset your Network settings. If you know the methods of a network reset, then it’s a good thing. But if you don’t, then it will become a headache. But worry not, that’s why we are here for you by bringing the helpful methods to easily reset Network Settings in Windows 10.
When you reset your Windows 10 Network settings, it basically removes and reinstalls all network adapters which are currently installed in your computer system. In other words, network reset takes all network components back to its default factory settings such as TCP/IP protocol (used for communication over the internet) and Winsock (handles input and output server request to the internet).
It’s a good thing because your Windows 10 computer network problems will be solved right? but, it removes your every saved wireless connection, its password, and other customized connection from your computer. So take a separate note if you have customized the default network settings before performing the reset.
So now, without further delay, let’s move to our main topic in this article.
Does Network Resetting Affect Personal Data and Files
What if I say it does affect your computer personal data and files. Don’t panic, it’s just a joke. Basically, Network reset is just a small reset so you don’t have to worry about any files and data. All your downloaded apps and software are also untouched during the network reset.
So, without any worry move to the following steps down below to reset network settings in Windows 10.
How to Reset Network Settings in Windows 10 | Reset Network Settings Windows 10
The steps which we are going to use down below are so straight forward, which only takes a few minutes. We are going to use two different methods for the Windows 10 network settings reset.
Using Network Settings
This is the first method to easily reset Network settings in Windows 10. If you don’t want to deal with the network issues in your computer, then follow the following steps down below.
- First, open your computer and go to the Windows search bar located at the left bottom side.
- After that, type Network Status which opens the Network and Internet settings of Windows 10.
- Now, scroll down at the end and click on the Network Reset option. After that, it takes you to another page, which consists of the reset button.
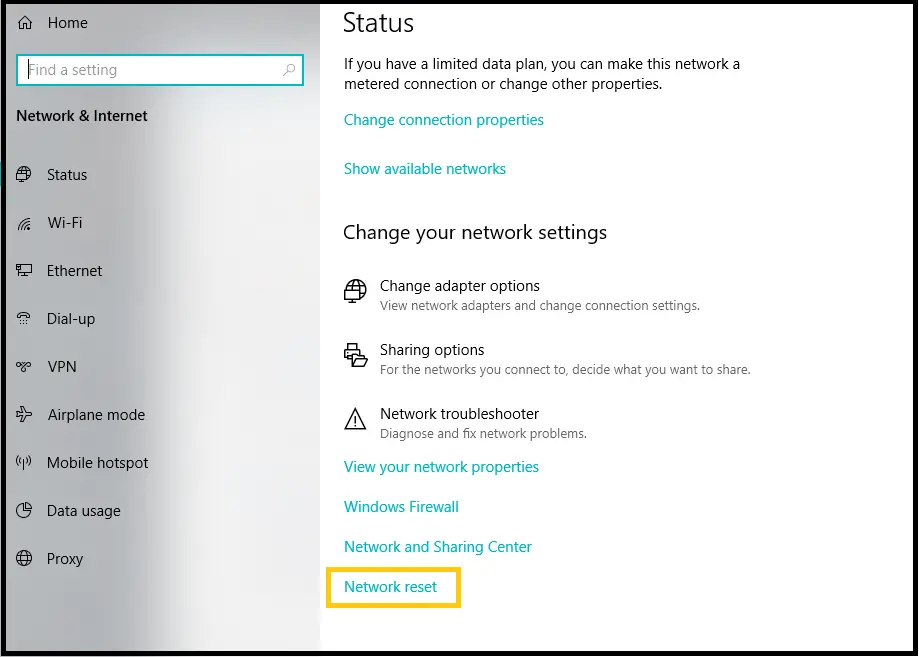
- Here, review the reset information message, and once you are done, then click on the Reset Now button.
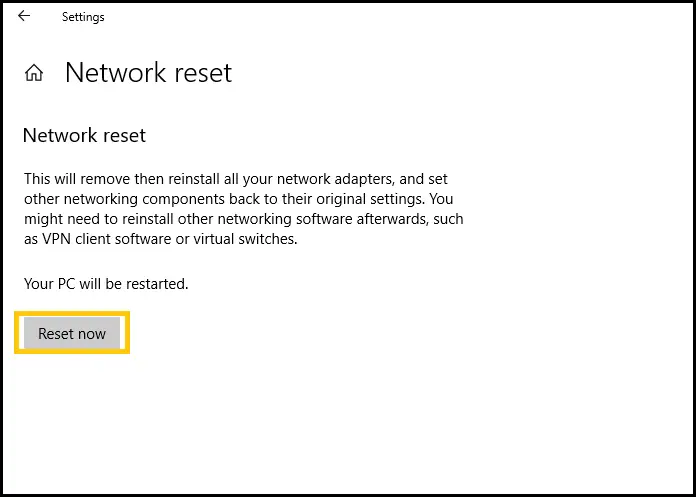
- After that, it pop-up a message, “Are you sure you want to reset your network settings?” Today we are here to reset Windows 10 network settings, right? So choose the Yes option.
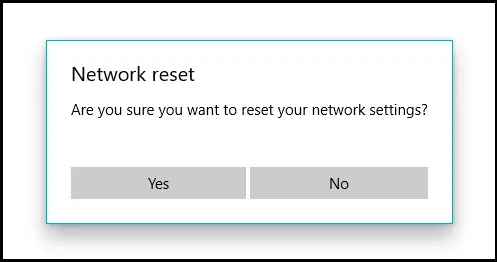
- Now the reset process will continue, and after some time, you will get a warning message when your computer is going to restart. Your computer will restart automatically.
- After the successful restart, you will see that all your previous connections are reset. So in order to re-connect, select the network option (Wi-Fi icon), then choose the network and click on the Connect button.
That’ all for the Windows 10 network setting reset on your computer. Now, let’s move to our next method, which is using a CMD.
Using Command Prompt
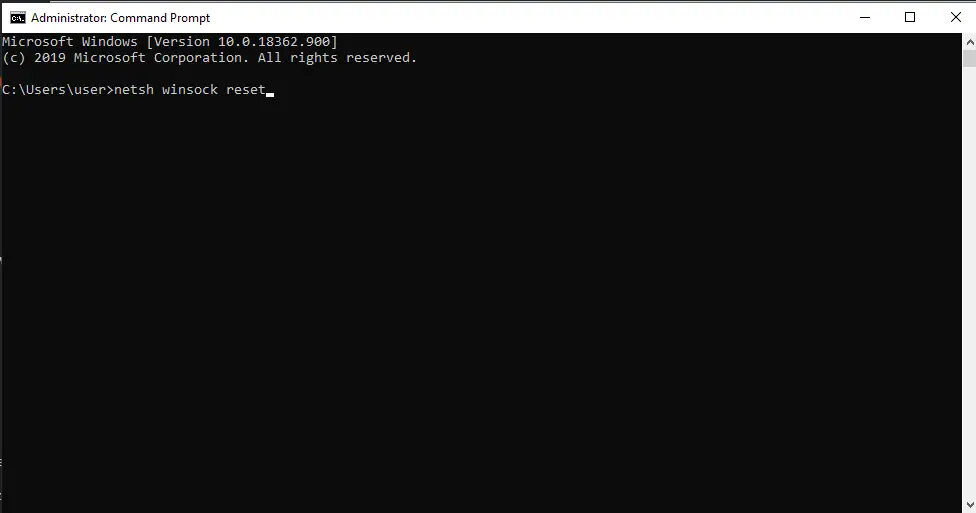
The good thing about the Windows 10 operating system is that I allow the users to reset Network settings with the help of CMD. Whatever the network issues you are facing in your computer, just follow the simple few steps down below to solve those issues.
- In the Windows search bar and type CMD and open is from Run as Administrator. If you directly open the CMD in normal mode, then you can’t reset your network as it requires the admin permission.
- Once you access the command prompt, then type netsh winsock reset and afterward press enter.
- Now, wait for a few seconds until the command will complete. Once it said, the “Winsock reset completed successfully” then restarts your computer to save the changes.
So with the help of a few steps, you can easily reset Windows 10 network settings.
How to Delete a Wireless Network Profile in Windows 10
Whenever you connect to the new Wi-Fi connection, then those networks automatically saved in your computer even though you are no longer going to use them. Over time, you have so many Wireless networks saved in your Internet settings.
So, if you have too many wirelesses network saved in your computer, which you don’t use, then you can delete them with simple steps. What that does is prevent your computer from reconnecting with those saved wireless networks. This way, you can only save the Wi-Fi network which you need in your Windows.
Now, how can you delete the wireless network profile in your Windows 10?
Let’s have a little look down below.
- Go to the Internet Access (Wi-Fi bar) icon, which is located on the bottom right side on the taskbar.
- Now, click on the Network & Internet Settings, which takes you to the settings page.
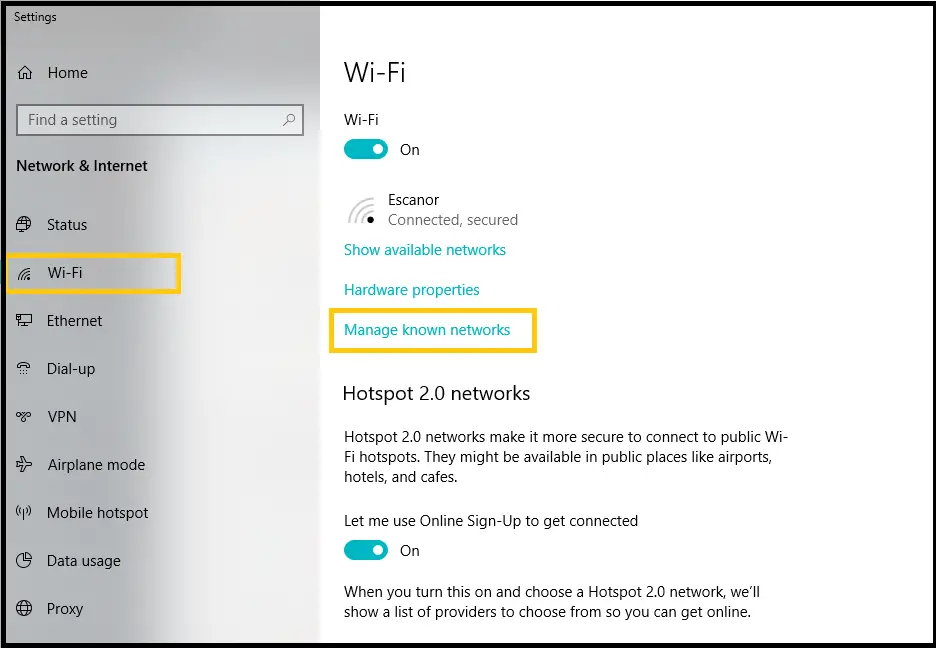
- After that, select the Wi-Fi option from the left side inside the Network & Internet.
- Now, click on the Manage Known Networks, which opens the list of wireless networks, which are saved on your computer.
- So, left-click on the network which you want to erase or delete and choose the Forget option.
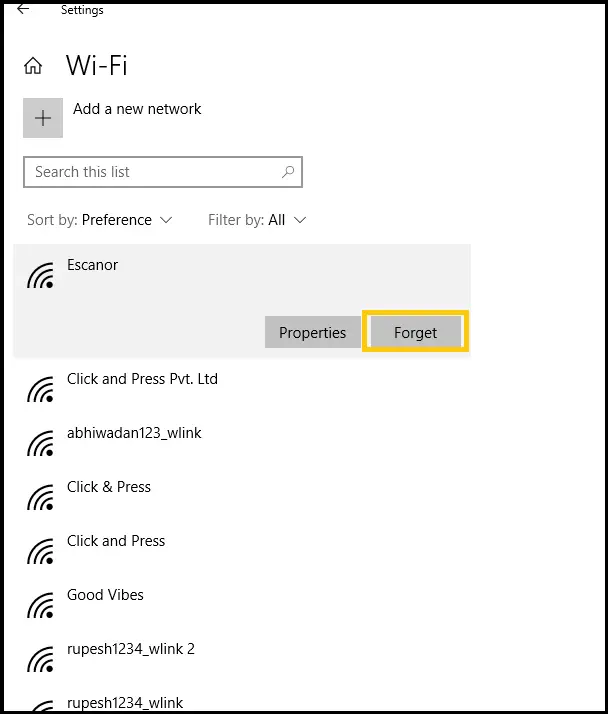
There you go. You have successfully deleted the Wireless network profile in Windows 10. Now, follow the same steps to delete all unknown saved networks from your computer.
Should You Reset your Computer Network Settings
Here’s a simple answer to this question. If you have normal network connection issues then first try to solve it with troubleshooting. If that option doesn’t work then only move to the reset option. But remember your WIFI, Bluetooth connection, VPN connection, Ethernet network, and network adapter will also reset.
FAQ About the Reset Network Settings in Windows 10
So here are the other questions regarding the reset network settings in Windows 10. If you have other queries besides the network reset settings, then you might find them here down below.
What Happens When You Reset Your Network Settings in Windows 10?
If you reset your Windows 10 computer network, then Windows will forget your entire Ethernet network, Wi-Fi networks, and its password. Not only that, If you have other additional connections such as VPN or Virtual switches, then they will no longer be in your computer system. Let’s say it will wipe out your entire network or connection, which was saved in your Windows 10 PC.
What Does It Mean to Reset Your Network Settings?
Well, it’s like your Windows forget all your networks and connections, which are linked with the external network like Wi-Fi, Ethernet, Mobile network, and Bluetooth. So basically, you will have no saved network connection on your computer.
Is it Ok to Reset Network Settings?
Well, it depends on your network connection – if you are facing a problem while connecting with your Wi-Fi, Ethernet, Bluetooth, or any other cellular networks, then its fine to reset your Windows network settings. Otherwise, why to play with network settings if your Windows 10 PC networks are working fine.
Conclusion
So follow the above following methods to solve your Windows 10 networking problem. Besides, you can also try troubleshooting to solve your issues. It somehow solves the most network problem, but it has a limited scope. So if it doesn’t work, then reset is the only last option to get rid of the networking issues in your PC.
Was this article helpful to solve your Windows 10 networking problem? Let us know in the comment section down below. We love to hear our visitor’s thoughts.
Thanks for reading our article and do share it with your friends if they are facing the same problem.


