There is a difference between Amazon’s customer account and Amazon’s seller account. Similarly, A seller account is very different from a customer account. Only amazon sellers’ account requires an Amazon account number. Nowadays buying and selling have become digitilized and simple. So, you may ‘How do I find my Amazon Account number?’
Answer: To find your Amazon account number.
1. Sign in to the Amazon web services management console using your IAM username.
2. Select support.
3. Select a support center.
4. Your Amazon account number will be listed underneath the navigation top.
There are various types of methods to see the Amazon account number and we will discuss all the methods. And other features related to Amazon. And the process to sell products on Amazon and the fees needed to start selling products on Amazon.
What Are The Accounts That You Can Create On Amazon?
There are main two types of accounts they are:
- Individual account
- Professional account
These are the main two accounts Amazon offers and you have many other accounts for various use and they have different names. People even call the basic Amazon account. The basic Amazon account is free and it’s even called an Amazon customer account. Other Amazon accounts differentiate between customers and sellers on Amazon.
The names of the account that differentiate the customer, seller, and Amazon web services accounts are;
- Amazon customer account
- Amazon sellers account
- Amazon web services account (AWS)
What Is An Amazon Service Account?
An IMA or a service account is a resource in IMA that has associated credentials and permission. An IMA user can represent a person or an application that uses its credentials to make an AWS request. This is typically referred to as an Amazon service account.
What Is An Amazon Customer Account?
Amazon customer account is an account that the customer uses. It is used for watching the items listed on Amazon and placing your order on Amazon. This account doesn’t have an Amazon account number. It is associated with your email address.
How Do You Create An Amazon Customer Account?
Further, the Amazon customer account is the account that is used by the customer to place their order and to filter the best items listed on Amazon. The steps for creating an Amazon customer account are listed below.
You can add the device to your amazon according to your need.
Step 1: Open The Amazon App Or Amazon.com
Open the Amazon app or go to Amazon.com using the browser. Or download the Amazon app if you don’t have an Amazon app.
Step 2: Select The Create Account Option
After you opened the Amazon app the app will ask you a question about creating an account. And at that time click on the create account option.
Step 3: Enter Your Email Address
Enter your email address after you click on the create account option.
Step 4: Add A Password For Your New Account
Add a new password for your new Amazon customer account and you will be able to filter and add your favorite goods to your cart.
After following these steps you can you have successfully created a customer account. And now you will be able to filter among your favorite goods on Amazon.
What Is An Amazon Web Service Account?
AWS (Amazon web services) is a comprehensive, evolving cloud computing platform provided by Amazon that includes a mixture of fracture as a service(Laas), platform service (PaaS), and packaged software as a service (SaaS) offerings.
How Do I Create An Amazon Web Service Account?
Amazon web services provide a highly reliable, scalable, low-cost fracture platform in the cloud that powers hundreds of thousands of businesses in 190 around the world. As well as if you want to create an Amazon web service account then you can enjoy all those features. The step-by-step guide to creating an Amazon web service account is given below.
Know various services about Amazon.
Step 1: Open The Browser
Firstly open the browser on your computer. You can use any browser (chrome, safari, UC browser, etc)
Step 2: Open Amazon Web Service Home Page
After you opened the browser then open the Amazon web service home page website to create an Amazon web service home page.
Step 3: Now Click On Create An AWS Account
You will see an option for creating an AWS account in your top right corner. Click on that option for creating an AWS account.
Step 4: Add A Password To Your Account
Add a new password for the new Amazon web services account. Secondly, after that, you have to activate your account so that you can use your Amazon web services account.
After doing all the steps you can now finally create an Amazon web service homepage. And enjoy your highly reliable, scalable, low-cost fracture platform in the cloud.
How Can You Activate Your Amazon Web Service Account?
You have to activate your Amazon web service account to use the features of the Amazon web service account. If you haven’t activated your Amazon web service account then you cannot use the Amazon web service account. The steps to activate your Amazon web service account are as follows.
Step 1: Open Amazon Web Service
First, open the Amazon web service to activate your Amazon web service account.
Step 2: Click On Confirm Your Identity Page
After you opened the Amazon web service website you will see an option to confirm your identity page on the top left corner. Click on that option then you will load into a new page after that.
Step 3: Select Contact Method
Select the contact method after you selected the confirm the identity page. You will get a verification code on your phone number.
Step 4: Select Your Phone Number And Region Code From The List
You will see a list of phone numbers and region codes. Now select your phone number and region code from the list. So that you can get your verification code on your phone to activate your Amazon web service account.
Step 5: Enter The Captcha
If you are presented with a captcha code, enter the captcha code displayed on your screen.
Step 6: Enter The Received Pin
Enter the received pin from the company in your SMS box. The pin should be 6 or 4 digits long. Scroll down and you will find a blue highlighted box written with continue click on that box then you are good to go.
After following these steps written in this article then you can activate your Amazon web service account. And enjoy the facility provided by Amazon at a cheaper price.
Why Do I Need An AWS (Amazon Web Service) Account?
An AWS account provides natural security, access, and billing boundaries for your AWS resources and enables you to achieve resource independence and isolation. For example, users outside of your account do not have access to your resources by default.
What Is An Amazon Seller Account?
Think of seller central as you go to resources for selling on Amazon. It’s a portal to your Amazon business and a one-stop for managing your selling account, adding product information, making inventory updates, managing payments, and finding helpful content to help you navigate your Amazon business.
How Can You Create An Amazon Seller Account?
Similarly, an Amazon seller account is an account that the product seller of Amazon uses. To create an Amazon seller account you must have a popper governmental document with you because an Amazon seller account needs to be verified by the government.
Note: you must have a business email address, identity verification sellers and customers, tax information, etc. the step by step process to create an Amazon seller account is given below.
Step 1: Open The Browser On Your Pc
First, go to service. Amazon.com to get started with your process.
Step 2: Select To ‘See Pricing’
You will see this section when you scroll down the page and look to the right. Click on the ‘see pricing’ button under the make money option. You will be redirected to the registration page for professional sellers.
Step 3: Choose Between Individual Or Professional Seller Account
Now, this website will offer two seller plans: professional and individual. A professional account is recommended if your selling rate exceeds 40 products per month. Although you may intend to sell as a hobby and not as a professional you can still benefit from this plan as it can save you money.
Step 4: Click On Create Account
After choosing the individual and professional sellers’ accounts. There is an option for creating your Amazon account on the third option. Click on that option and provide all the information regarding creating an Amazon account.
Step 5: Choose Your Business Location And Business Type
Next, you have to provide your business location. Like where your business is located etc. and website personnel will verify this information so it must be accurate. You also have to give them specific detail about the type of business you are running and specify your products.
Step 6: Fill In All Your Details
To allow you to continue, the website will request some personal details. You will be asked to provide a form of identification, which could be your driver’s license or passport number, depending on what works for you.
Step 7: Choose Your Marketplace
Meanwhile, Amazon has several marketplaces, so once you are done on the previous page, you will have to choose which marketplace you want to sell ( for example Amazon. co. the UK, etc) and then click ‘next’.
Step 8: Provide Billing Information
Another way through which Amazon verifies your identity is to confirm that your credit card information is valid or correct. The next step after choosing your marketplace is to enter your card details (name on the card, number, and expiration date). To verify Amazon account details, always cross-check the information you have provided. After completing this click next.
Step 9: Describe Your Products(s) And Store
The next step is to provide your credit card information and verify it. There will then be questions regarding your store and the products you will be selling. During, The next step in the registration process is to answer the following questions.
- Your store’s name
- Do you have a UPC product (s)
- Do you manufacture or own the brand of the products (s) you offer for sale
- Are your products trademarked? After you’ve answered each question, click next.
Step 10: Verify Your Address
The last step to verify Amazon’s account details is to confirm the business address you provided in step six ( the ‘personal information section). Once you click confirm button provide the address displayed was correct of course you will see a new page.
Step 11: Enter The Verification Code
After you had verified your address a postcard will be delivered to your address, along with a verification code into the field below ‘Enter the code below and click ‘next’ to complete the verification process.
Now, that you know what it takes to become a seller on Amazon and how to get an Amazon seller account created, the next step is to be clear on the fees involved.
Hide your Amazon orders according to your need.
What Does It Cost To Sell On Amazon?
You can start selling on the platform for free, which is a great thing. However, there are costs associated with the private label business model (at a higher price) since you have to purchase your inventory first. but you may be surprised to learn that it isn’t as costly.
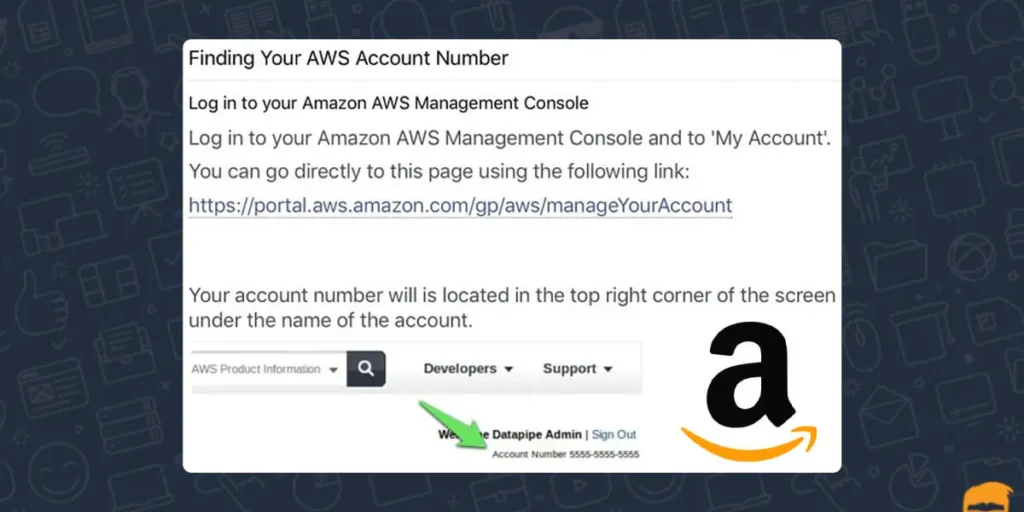
How Do You Find Your Amazon Account Number?
Every Amazon account is associated with your email address and name. And under the username in my profile section. Now we will help you to guide how can you find your Amazon account number. The step-by-step guide to finding the Amazon account number is given below.
Step 1: Open The Browser
So, Open the browser on your pc or laptop then go to Amazon.com
Step 2: Log In To Your Amazon AWS Management Console
Log in to your Amazon AWS account and find your Amazon account number.
Step 3: Click On My Account
After logging in to your Amazon AWS management console account. Click on the “my account” option on your left.
Step 4: Click On Up Right Corner Of The Screen
Your Amazon account number will appear under the account name in the upper right corner of the screen.
It is a very easy process to find the Amazon account number. Just by following these 4 steps, you can find your Amazon account number.
What Is An Amazon Customer Account?
An Amazon customer account is an account used by Amazon users to add goods to the cart. The Amazon customer account is an account in which you don’t have an account number and eventually, your account is verified by your email and mobile number.
How To Create An Amazon Customer Account?
Similarly, creating an Amazon customer account is a very easy process. And you don’t have to verify lots of things to open or create an Amazon customer account. Meanwhile, The process to create an Amazon customer account is.
Step 1: Open Amazon.com Or Download The Amazon App On Your Device
Open the Amazon app or Amazon.com on your pc or your mobile phone.
Step 2: Click On Create Account Option
On the first page after opening the page or website you will see an option for creating a new account. Click on that option for creating a new account.
Step 3: Add Your Name And Email Address
After that add your email address and name to the specified place and click on next to find another page.
Step 4: Verify Your Account
Verify your following account with the code. likewise, the code will be sent by Amazon to the email you provided during creating your account.
Verifying is the last step after you verify your account you can filter goods on Amazon and add them to your cart.
How Long Is An Amazon Account Number?
An Amazon account number is 12 digits long and you can find your Amazon account number on my profile option in the upright corner of the screen.
Can You Create A Guest Amazon Account?
Amazon household requires a unique Amazon account for each adult. And other than adults who don’t have an Amazon account, they can create one either when they accept their invitation or when they sign up with you. Moreover, An Amazon guest account is also called an Amazon household account.
Frequently Asked Questions (FAQs)
here are some of the frequently asked questions about Amazon and Amazon orders.
Can You Use Amazon Without A Credit Card?
You have a lot of options to shop on Amazon without a credit card. Shop with a debit card, ACH checking accounts transfer, or prepaid debit card. Or use can use cash by instantly adding funds to your Amazon account by purchasing gift cards or using Amazon cash.
How can I See My Purchase History On The Amazon App?
Click your account at the top of the page. Log in to your Amazon payments account. The overview page appears to display your account balance and account activity showing the most recent transaction at the top date.
Tips and tricks for your amazon account
How Do I Check My Amazon Balance?
Open the Amazon app on your smartphone and tap on the icon ‘Amazon pay’ there you will be able to see your Amazon pay balance in a box.
Can I Send Money To Someone’s Amazon Account?
Customers can send or receive P2P payments by simply selecting a contact from their phone contact book or entering the UPI ID or bank account of the recipient.
Can I Use An Amazon Credit Card Anywhere?
You can expect to use your Amazon credit card anywhere that takes a visa. This means you can use it anywhere in the U.S and in over 150 countries worldwide.
Conclusion
Besides Here we have shared all the possible solutions you need while fixing the issue on Amazon. Similarly, if you want to find any other solution related to Amazon then check this website. We hope we could give you the proper steps about how can you find your Amazon account number. However, Amazon is a bigger platform you might not know its features of Amazon so.


